Category: Blog
Blog
How to Pull Down TV mount Using Tranquil Mount
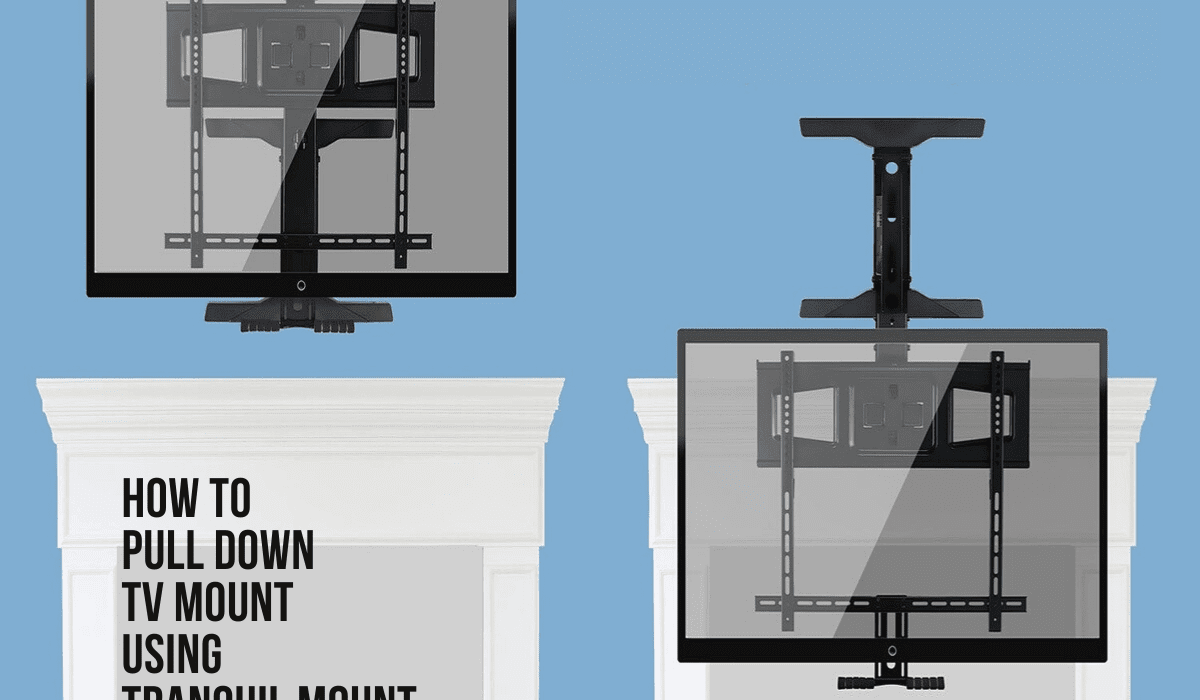
The Tranquil mount is easy to use and we wanted to show how easy it is to pull down the TV.
Tranquil mount is suitable for not just the fireplace but can be installed at school or in the office.
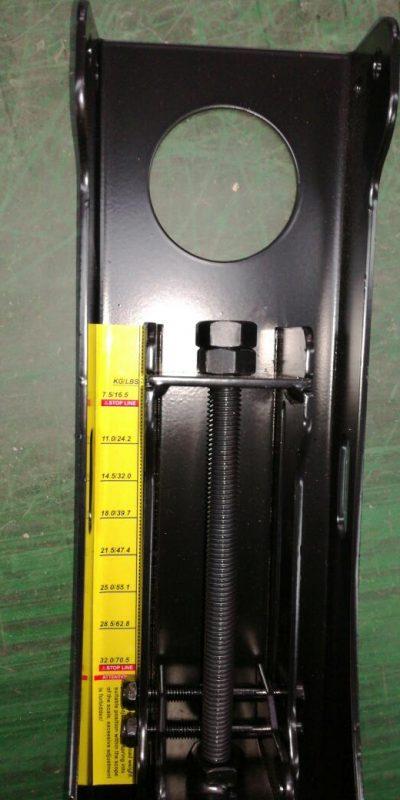
Pull Down TV Mount Spring Adjusting Technique – Scale Table Weight (kg) vs. Scale (mm)
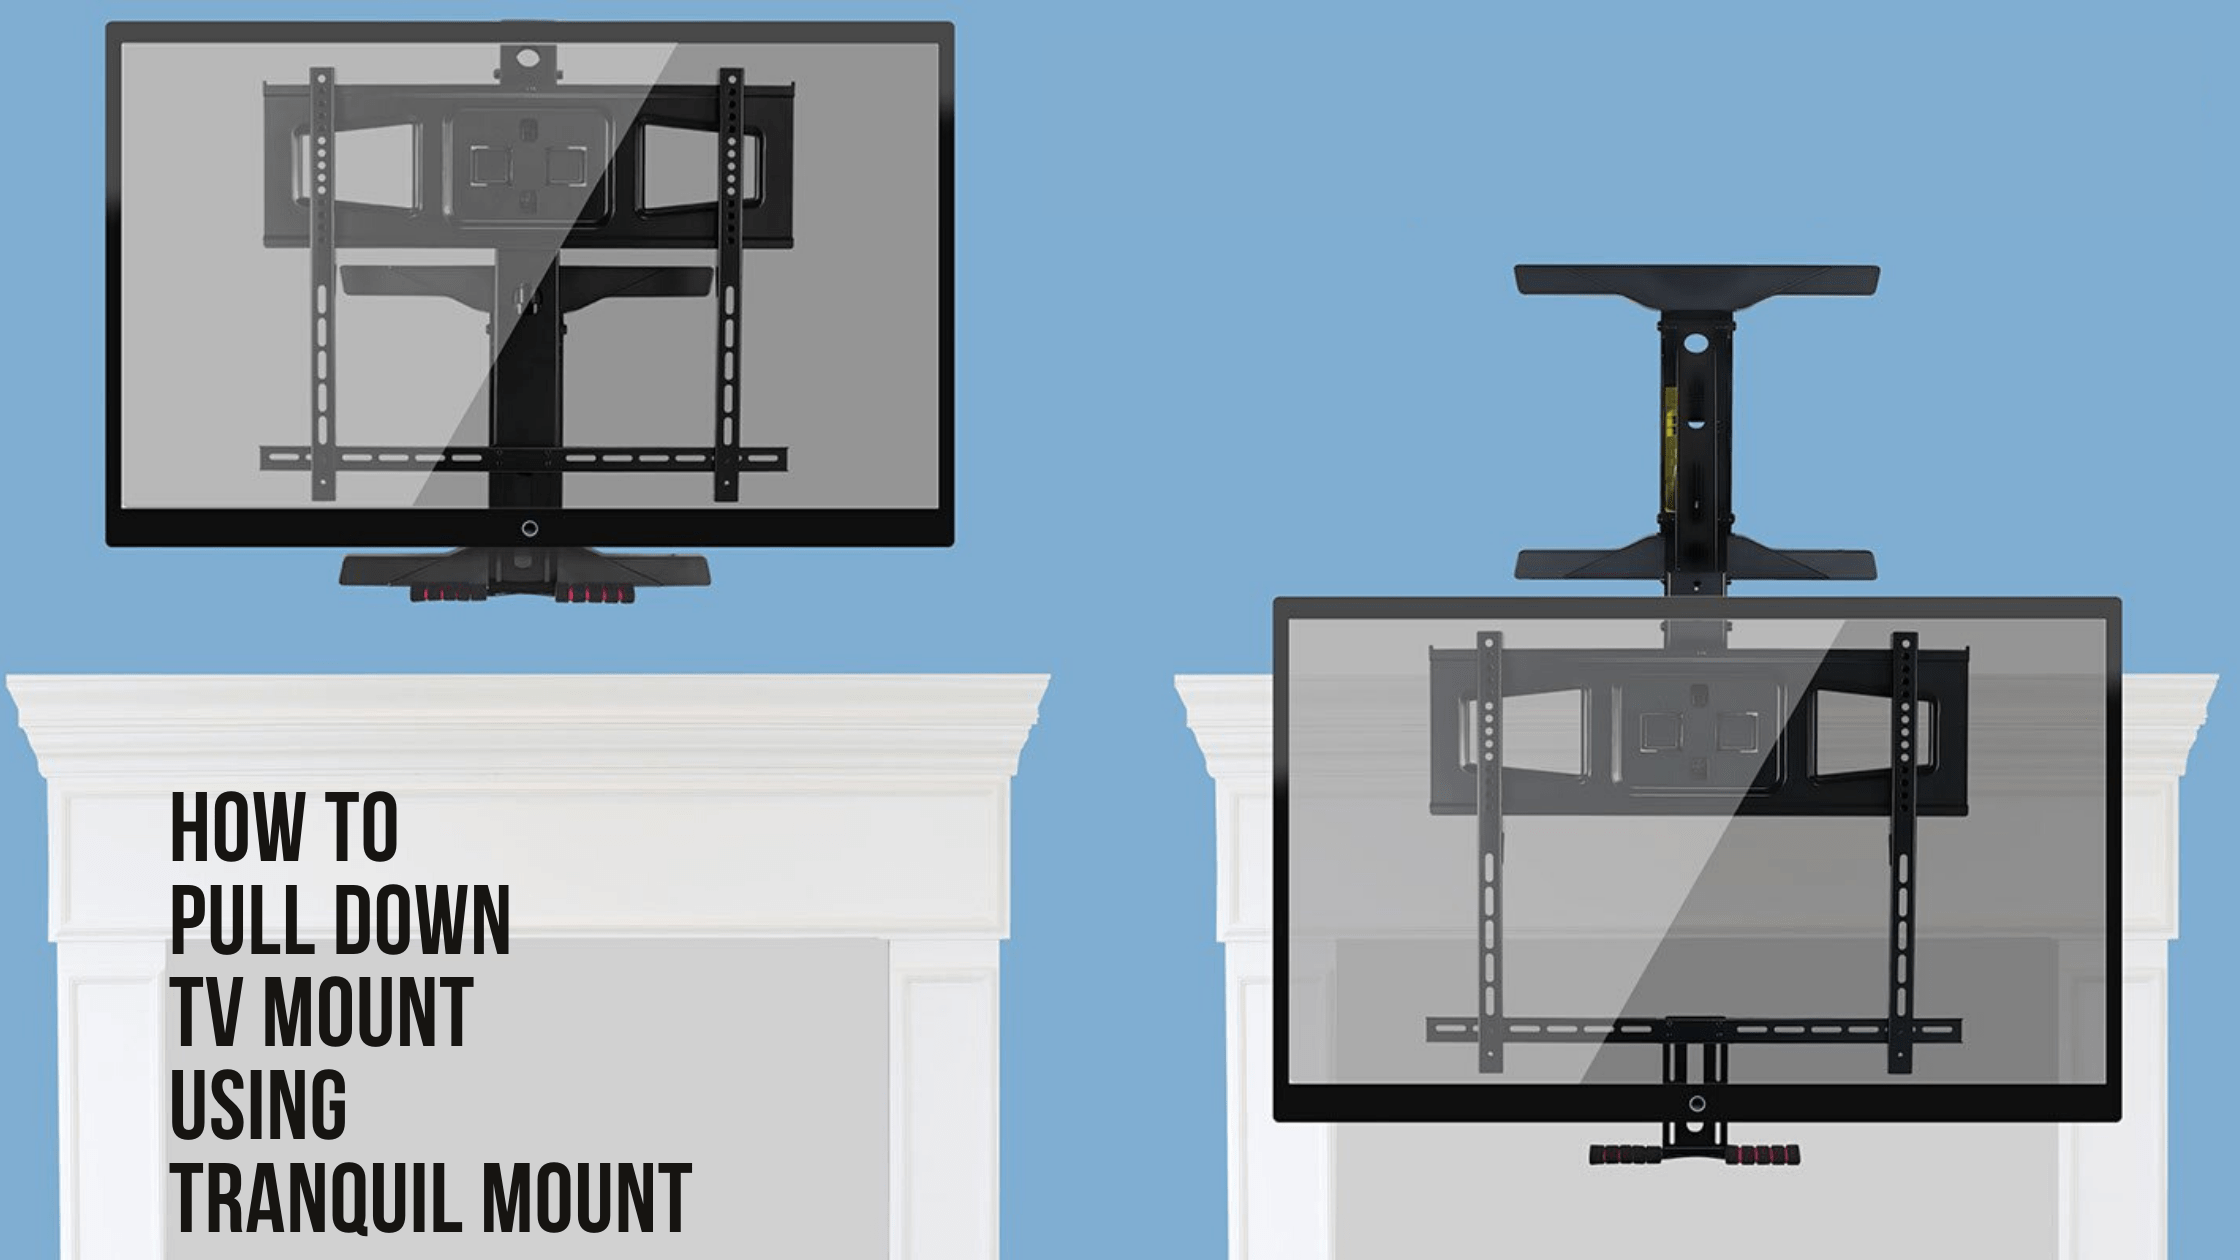
The Tranquil Mount requires some adjusting before installing above the fireplace or on the wall.
This is very simple and the tools are provided in the kit shipped.
Print the pdf below and use this to mark the location of the spring.
Download TV Mount Spring adjust Scale : Printable Area 17mm x 165mm scaleTV Mount Scale Table Down Link
TV Above Fireplace UK, How to Guide.
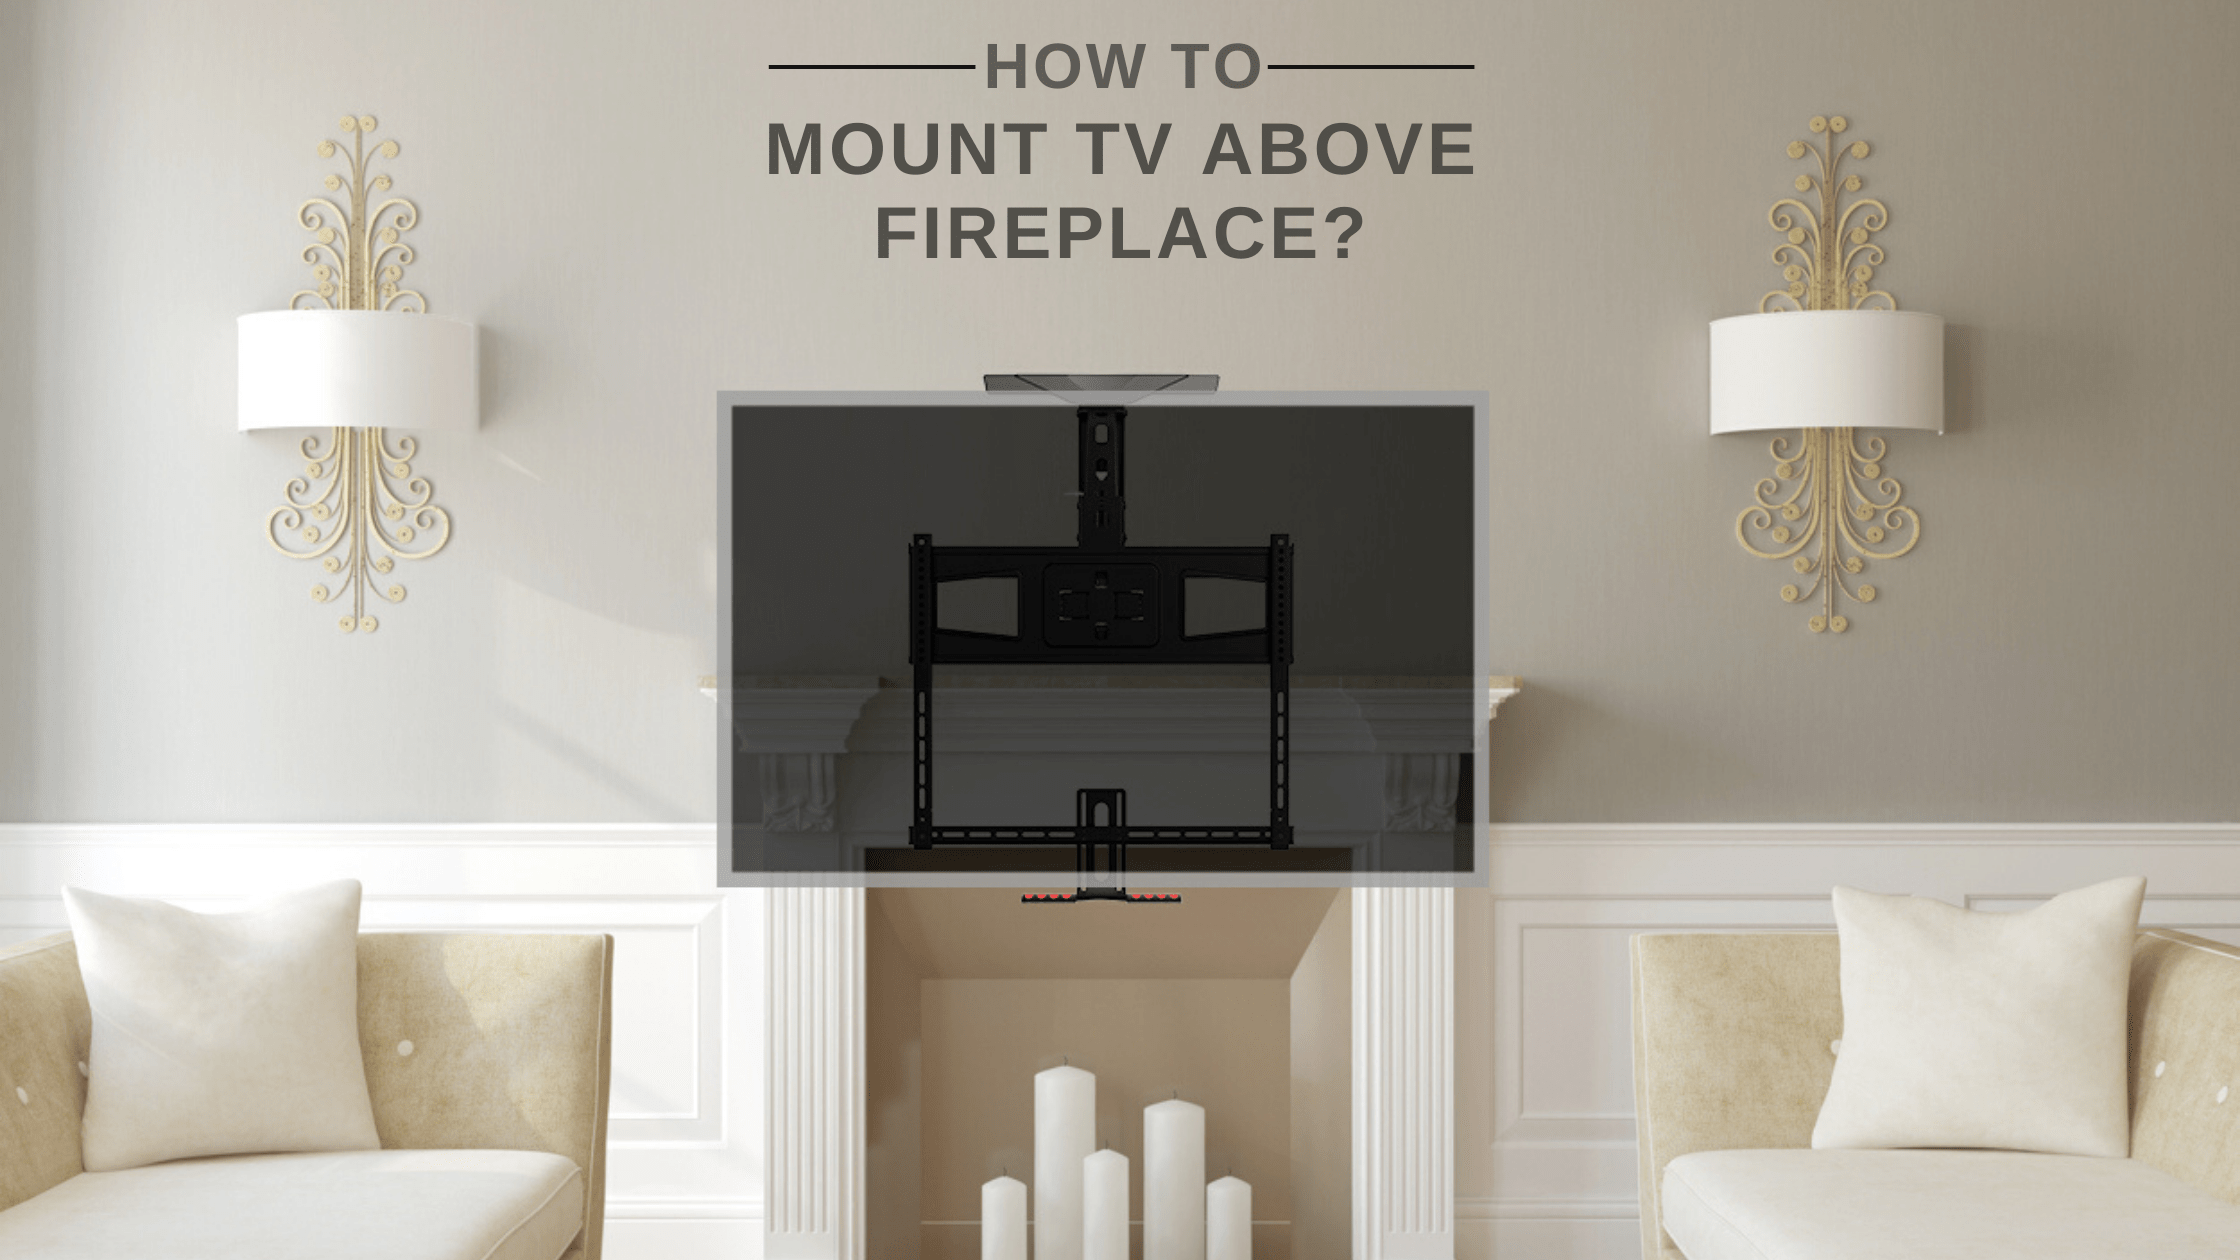
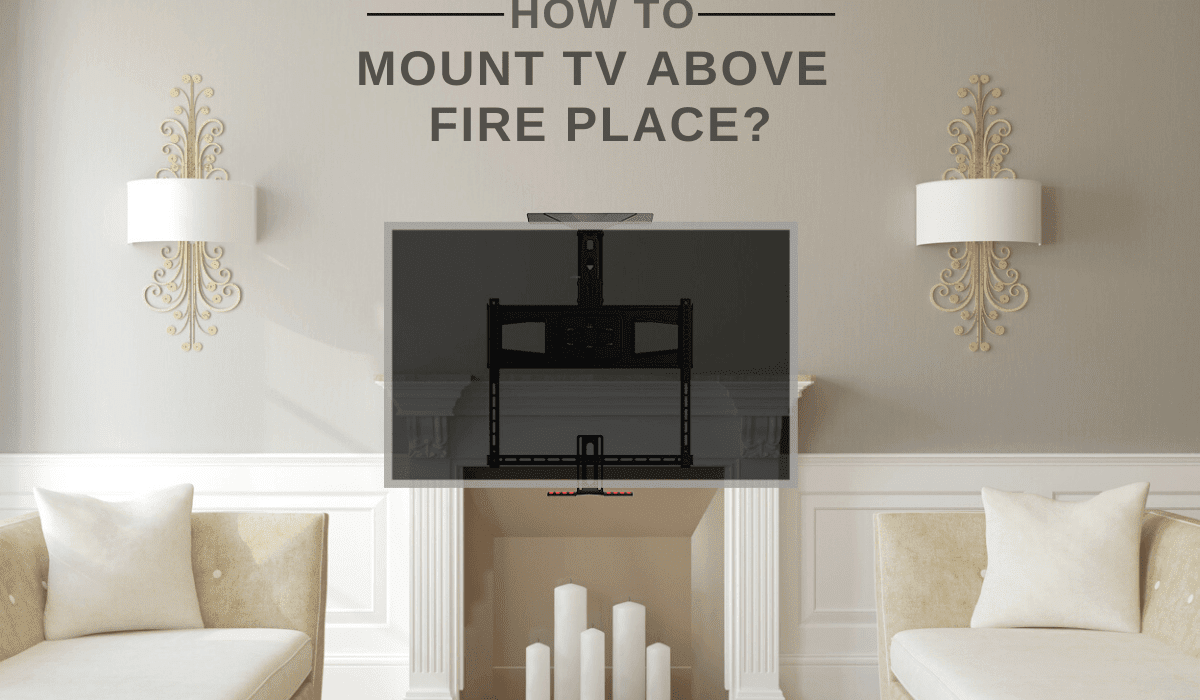
Mounting TV above fireplace
Mounting a TV above a fireplace mantel, different homes have a different architectural layout from another, going for a customary installation of a wall mounted flat screen TV is hard to accommodate. Sometimes the only location for the TV wall mount available is one above the fireplace mantel. In such a case, it is important to get it correct otherwise it may result in the TV getting damaged, either during the installation process or by the warmth of the mount location.
All Gas, Electric and Wood fireplaces produce heat, and although Electric and Gas don’t produce ash or smoke, the heat from these types of fireplaces can damage a TV if certain precautions are not followed.
The article attempts to look at the available options and planning to consider. It is always recommended using a professional installer they would have carried out many installs.
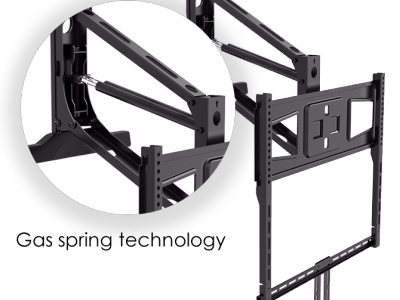
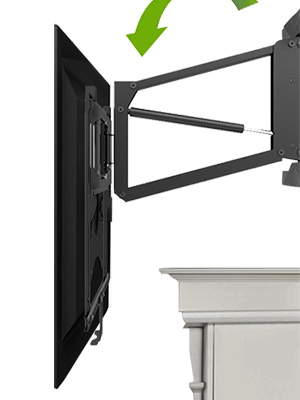
Preparation – Before Mounting a TV above a fireplace
Take a good look at the surroundings before mounting a TV above a fireplace mantel, common planning thoughts include the following:
Mark alignment of the television over the fireplace, if you considering placing it in the centre. This can be done with a second person to hold the television, a pencil marker, a tape measure, and a level.
Determine type of wall needed. Plaster board is relatively easy to screw into but you need to locate the studs, but brick, concrete, and stone are harder. Harder walls will need to be pre-drilled, and the holes fitted with wall plugs, before mounts can be attached.
Make sure the wall can take the weight of the TV and mount together. It is essential that you know what you are doing as you could damage the walls.
Ensure screws or bolts do not interfere with wiring or pipes in the wall. Use a pipe and wire detector, some stud finder have added function to locate pipes and wiring, as well as wall studs.
Ask an electrician engineer to Install power behind the TV and AV cable outlets to get the best finish and hide all the wiring of the television.
Carefully exploring all of these points makes the TV mounting much faster, easier, and safer.
Fireplace Reduce Heat Exposure
Protect your TV from getting too hot, most AV/TV devices operate at temperatures as low as 32 degrees Fahrenheit, it is critical to make sure that the TV is not forced to endorse constant maximum temperatures, which is around 90-100 degrees Fahrenheit. We recommend to keep the fireplace off when using TV over fireplace mount such as Tranquil Mount unique TV mount.
Ideally, devices should be kept at ambient room temperature as much as possible. The following points help owners position their TV in the safest manner:
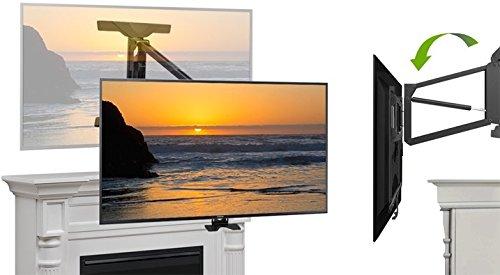
Fireplace mantel above the fireplace helps to deflect heat away from the wall but this does not always work for some mount that can pulled and pushed back onto the wall; the resulting wall temperature is often quite low but the heat raises upwards. Using a thermometer will allow you to gage what temperature you are dealing with in the planned television position and then recording each of the readings while the fire burns.
Wires into the chimney will not work if using gas and wooden fire.
Consider how often the television and fireplace used together.
Moving the television up slightly, away from the fire, also places it in a better position from a temperature perspective.
Fireplace Ash Exposure
Using an electric fireplace, there is no need to worry about fireplace ash. Concern is with an open coal or wood fireplace, ash and smoke can prove difficult and tricky under the wrong circumstances. To avoid excessive ash and smoke exposure, see approach below:
Maintaining fireplace regularly. Chimney should be cleaned on a regular basis, possibly every season, fireplaces should be cleared of ash and unburned fuel at least once a week to remove any build-up of debris.
Wood produces less smoke when burned dry, so freshly cut wood logs should be left to dry for a few months in a dry area before being burned. Hardwoods such as oak, beech, birch, and cherry burn at a much higher temperature than softwoods like pine, cypress, and cedar; therefore, give out less smoke as they combust.
Positioning Concerns
Installing the TV above the fireplace is a trade-off between saving space and the height of the television, but it can have a few unintended side effects, including uncomfortable viewing conditions for its owners, and unusual audio nuances. Thankfully, most of these issues can be remedied quite easily by using our TV Mount.
Avoiding Neck Strain
Neck strain can be avoided by hanging the television as low as possible or using pull down TV mount such as Tranquil Mount, so that viewers do not have to crane their necks to watch. Naturally, this is difficult for an over-the-fireplace mount. However, installing a Tranquil Mount will create a much more natural eye level viewing, creating a much friendlier angle. This also ensures that the picture quality remains as high as possible with good quality sound.

Optimizing Sound
Sound generated by LED/LCD TV speakers in most flat-screen televisions is low, higher television installations above the fireplace requires alteration in the way that the speakers are placed. This change is important, and is unique to every situation, depending upon the dimensions and final location of the TV. Ideally a sound bar will bring good quality sound out of your setup and using a sound bar mounting kit would solve your sound issues, the advantage is its cheap and does not require much wiring as you do with surround sound.
Fireplace options for Mounting tv above fireplace
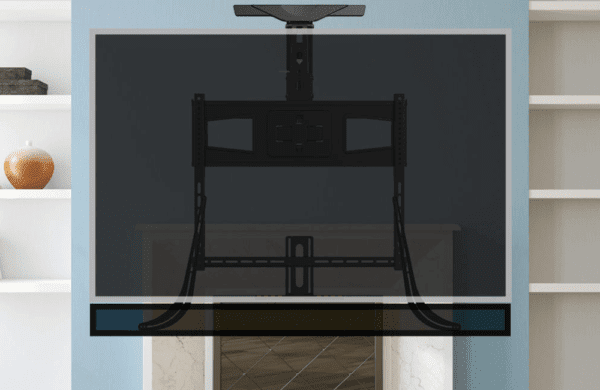
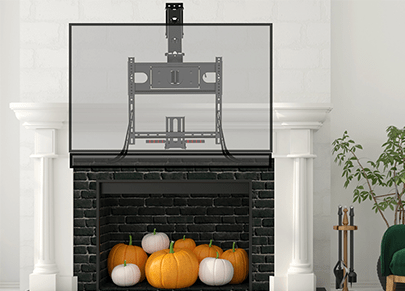
Pull-down TV mount, which can enable the television to move down to a more accessible viewing level
Television inside an unused fireplace, instead of over it.
Choosing Your Wall Mount for Mounting TV above fireplace
Type of mount chosen depends on the intended placement location of the TV, as well as whether or not the set needs to swivel, tilt, or move out from the wall.
Flat, shallow mounts which sit close to the wall; do not tilt or swivel; the simplest kind of mount available
Situations in which the television and the viewing area are roughly on the same plane
Cantilever TV Mount
Tilting TV Mount
Given the choice to tilt the attached TV up or down.
Ideal for televisions which are mounted higher up on a flat wall in line with the viewer, but which need to tilt to provide the best viewing angle.
Full – Motion TV Mount
Tilt up and down, right and left, and also rotate for a superior amount of angle control; allow the TV to be pulled away from the wall slightly.
Ideal for full control in almost any situation or when maximum flexibility is needed
Using the information from the preceding table, buying the right type of mount for the project can be much easier and quicker than would otherwise be the case.
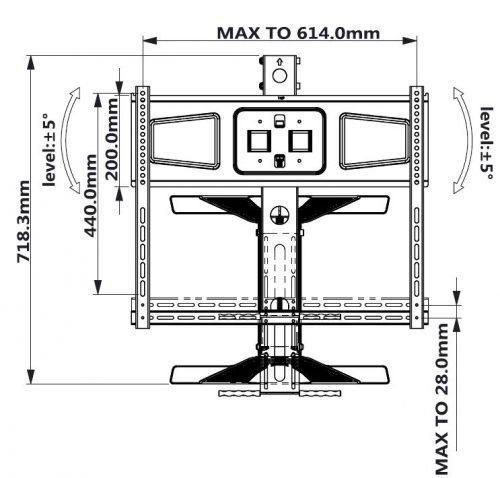
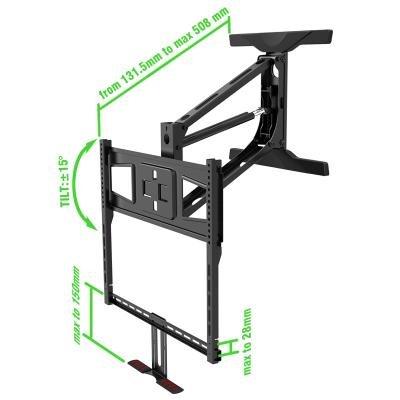
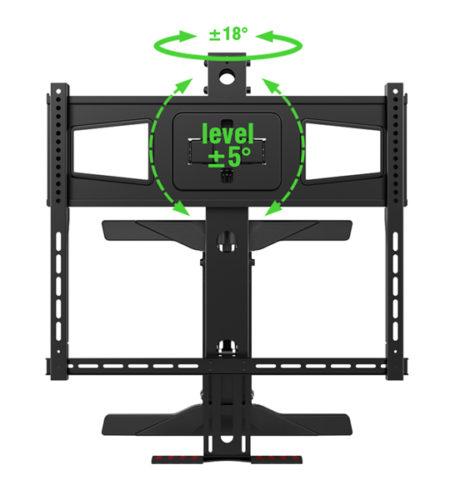
Motorised Electric Mount
Mounting the TV over a fireplace
Ensure all the tools are present and AV presentation and power sockets are available.
When mounting the television get some help and ensure that you don’t lift heavy items.
Before You Start Mounting tv above fireplace
Check the packaging for correct content before starting installation of the TV mount.
Hanging the Television above the fireplace Mantel
Actually hanging the unit is not as difficult a task as it may seem. Once the location is identified above the fireplace and holes, AV termination and power is completed it will be easy to install.
Follow the instructions provided in the manual, hire a professional AV company that can install the unit if difficulties are encountered or not sure about how to install.
Conclusion – Mounting tv above fireplace
Mounting TV over fireplace is ideal for today’s quest for extra living space, limited and expensive living space now a day’s means the journey to come up with some exciting ideas for the home. mounting a television above a fireplace mantel requires forethought and good planning but the end result will ne impressive.
Television needs to be protected and correctly installed to get the best out of the new setup.
Tranquil mount gives you the flexibility of mounting tv above fireplace with the added functionality to be able to pull the TV down for comfortable viewing
I am text block. Click edit button to change this text. Lorem ipsum dolor sit amet, consectetur adipiscing elit. Ut elit tellus, luctus nec ullamcorper mattis, pulvinar dapibus leo.
Video Electronics Standards Association (VESA) Standards for Video wall Mount
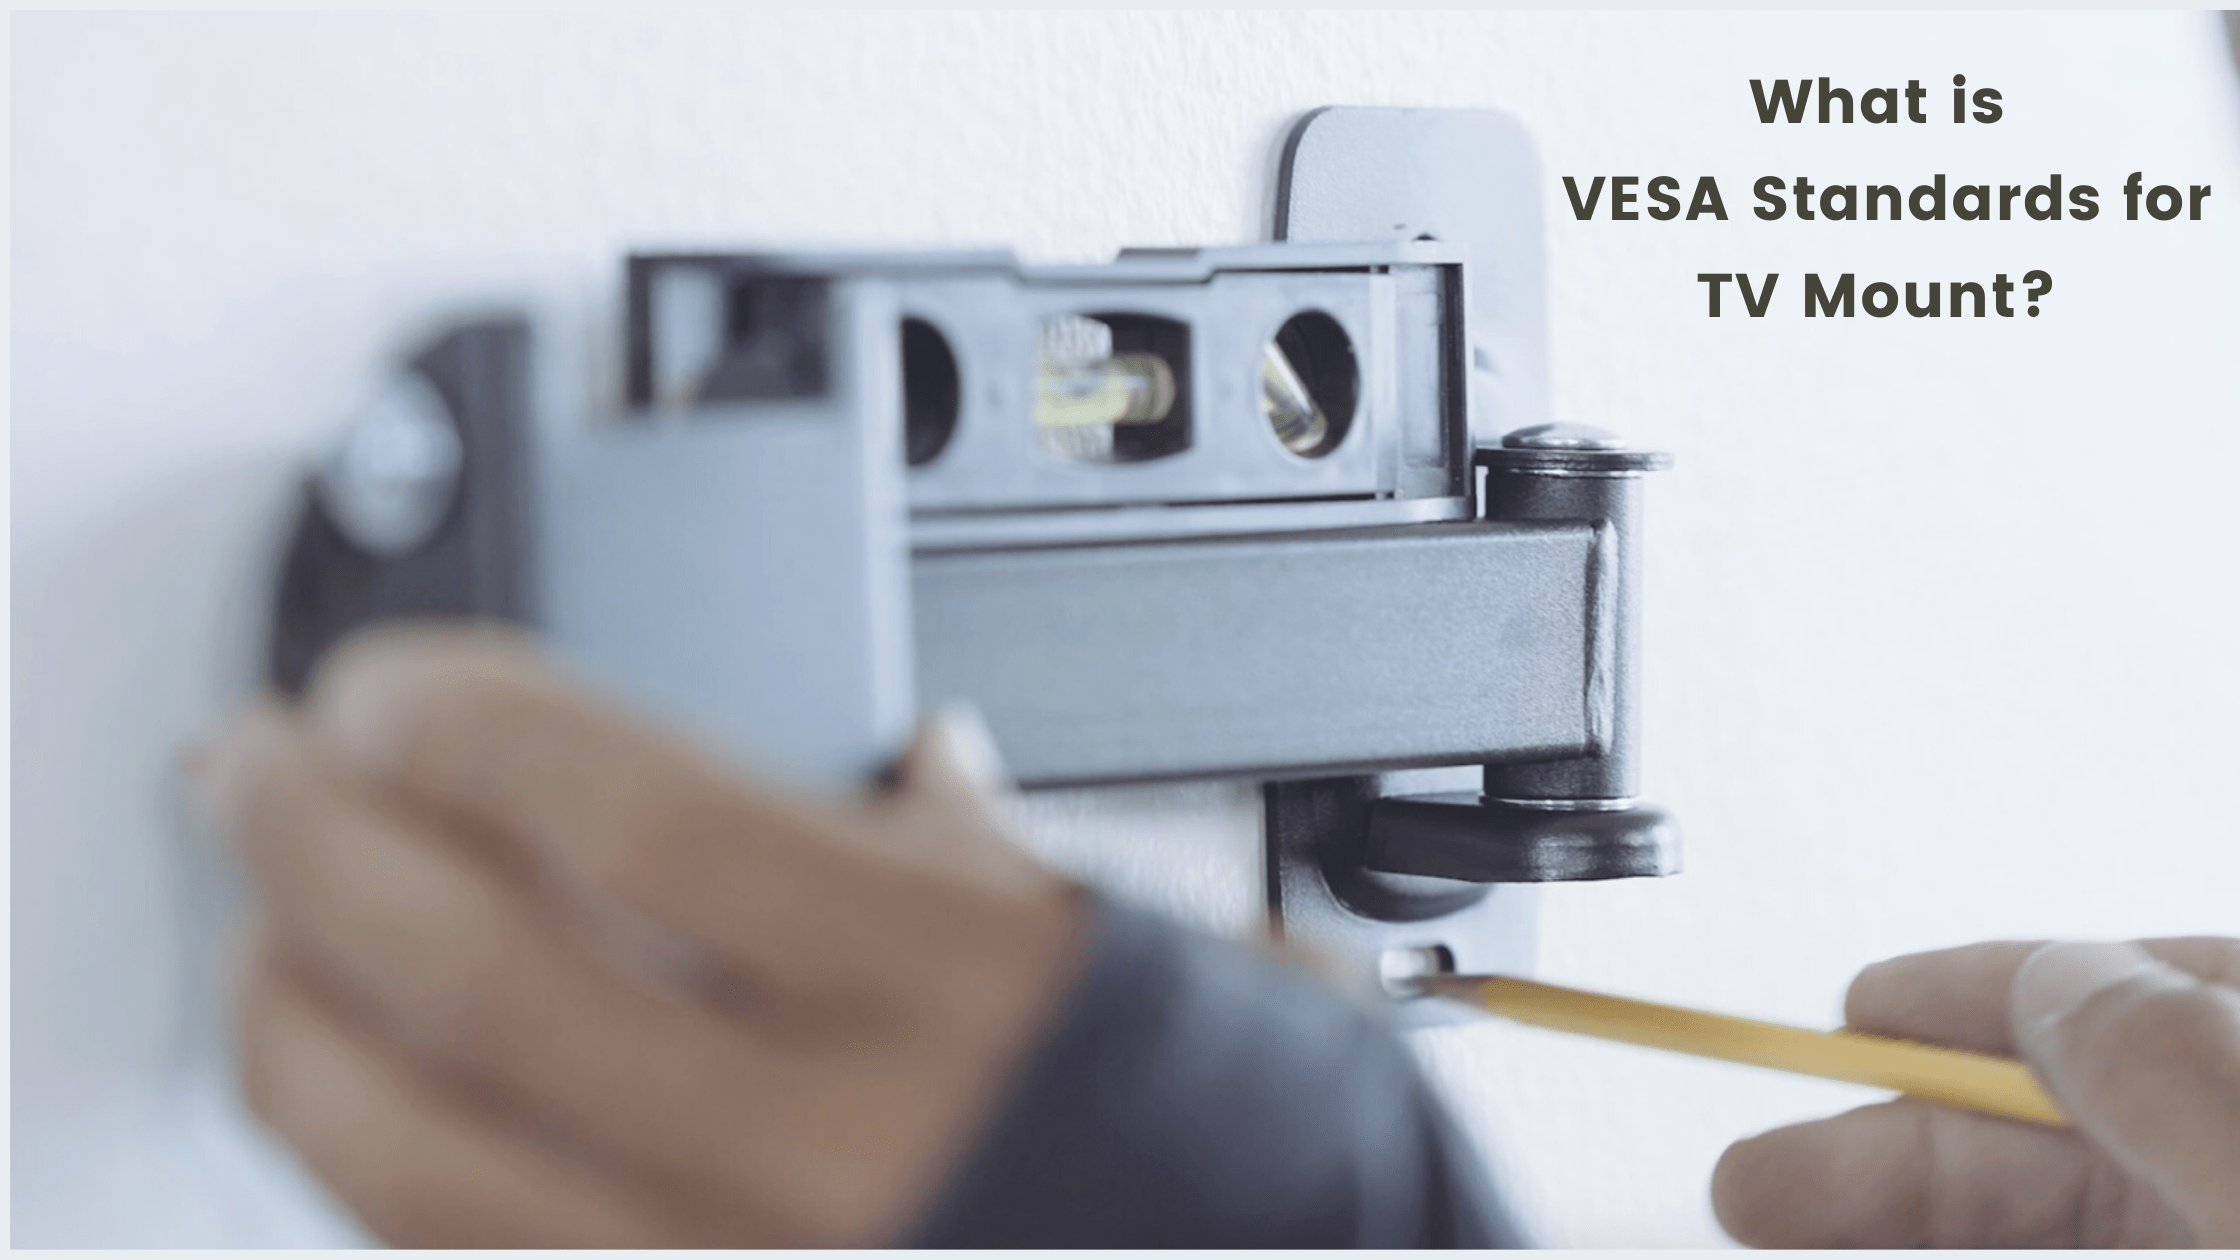
VESA TV Mount Standards
Video Electronics Standards Association, it is a professional organisation made up of a group of video electronics companies such as Samsung, LG, Sony and professionals that review new technology proposals and create sets of standards to promote uniformity in the consumer electronics industry for TV, Video Audio, and Monitors for LED, LCD, Plasma and more.
What are VESA mount standards?
Manufactures of flat screen televisions (LED/LCD/OLED) and Computer monitors adher to the industry wide hole pattern on the back of the TV or monitor for mounting purposes specifed by the standard.
Brackets have specific holes that align with the back of Video Wall Mount.
Hole sizes:
| Small TV Mount | Medium TV Mount | Large TV Mount | X-Large TV Mount |
|
|
|
|
|
|
|
|
|
|
The VESA standard is implemented by almost every well know TV Brands such as LG, Samsung, Sony, and Panasonic. The location of the bracket holes as diagram illustrates will determine the TV mount Position on the wall. The diagram below illustrates a VESA 400mmx400mm.
Deciding on a stand or bracket you must take this into consideration. Most Televisions will be compatible but you get the odd Telly that requires extra long bolts or washers, ether way this can be resolved by purchasing extra mounting kit online.
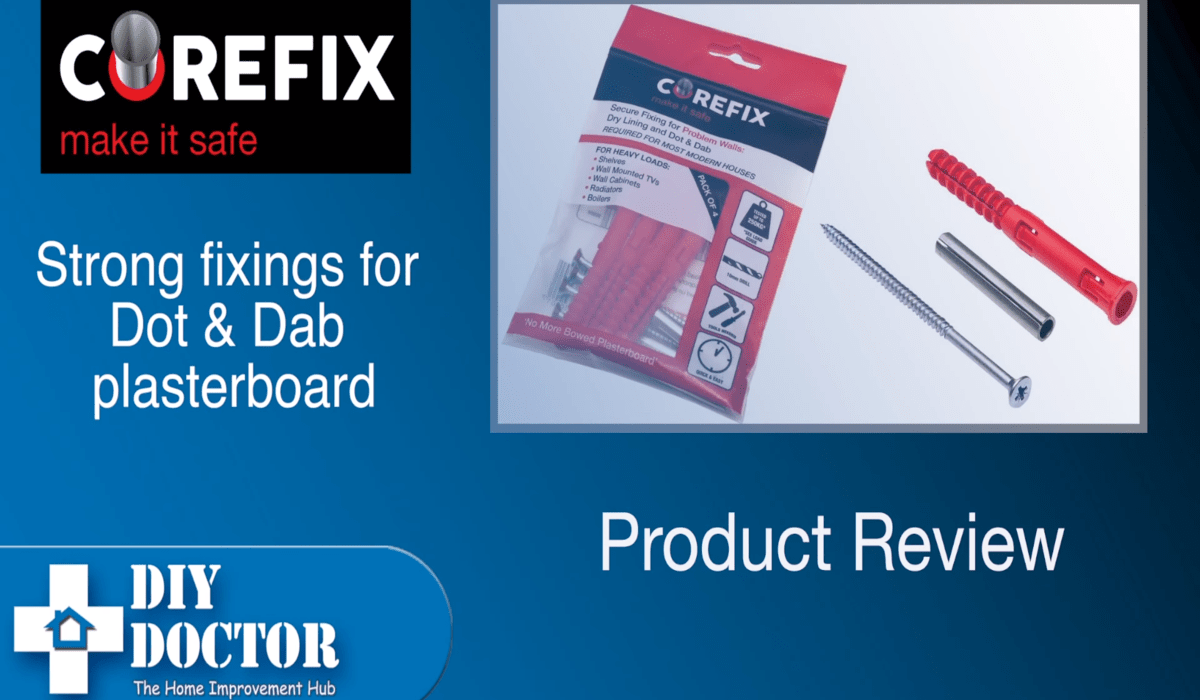
Some walls require dot and dab screws and these need to be purchased separately. The dot and dab plasterboard wall fixing is sold by Tranquil Mount.
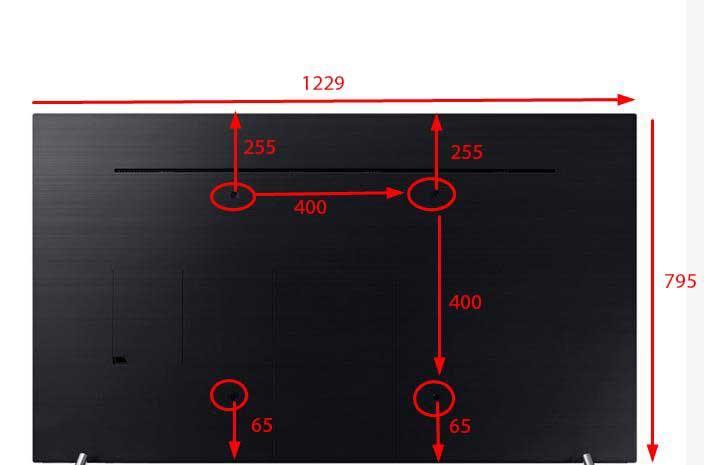
TV over Fireplace Pull Down TV Mount does apply these standards to its wall mounts.
How to Mount a TV Above a Fireplace and Hide Wires
Drop down tv wall mount
Tranquil Mount TV above fireplace Installation Video
This Video is a step by step install guide for TranquilMount pull-down TV mount.
Great install tips for installing TranquilMount with an LED/LCD Television above a brick fireplace mantel or flat plasterboard wall.
This Video shows the Drop down tv wall mount is easy to install above the fireplace or stud wall.
How To Install TV WALL MOUNT – Tranquil Mount TMO100A
TV WALL MOUNT INSTALLATION GUIDE
Tranquil Mount Model:TMO100A
Support 40″ to 65″ TV Screens
Load Capacity: 16.5~70.5 lbs (7.5~32 kg)
Compatibility Guide
TV VESA: 110x100mm, 120x180mm, 200x100mm, 200x200mm, 200x300mm, 300x300mm, 400x200mm, 400x400mm, and 600x400mm.
TV Weight (Without Stand): 7.5~32 kg [Once installed, Mount spring can be adjusted for the required weight]
TV Size: 40″ to 65″ (Recommend for use for TVs 55″ to 65″ (Not recommend for LG TV models, use TMO400A))
Important Things to Note
- Before any attempt on installation is done, the user should be able to read thoroughly and ensure that he or she understand the manual
- Tranquil Mount Ltd will therefore not be liable in case of on any damage done to either the TV or the wall since the manual require the installation to be done by a qualified personnel
- Serious damages on either the wall or the television may be encountered in case the manual is not followed to the latter. The manual provide correct procedures to be followed during installation to avoid any damages that may occur
- Avoid your hands from moving back and forth in the bracket to prevent them from getting trap and thus causing damages. Keep the product out of reach of children
- The product should be installed by at least someone with a basic knowledge in the building construction and has clear understanding of the instruction in the manual
- With maximum capacity of the wall bracket hitting a maximum of 32kg a weight above that may result to damages
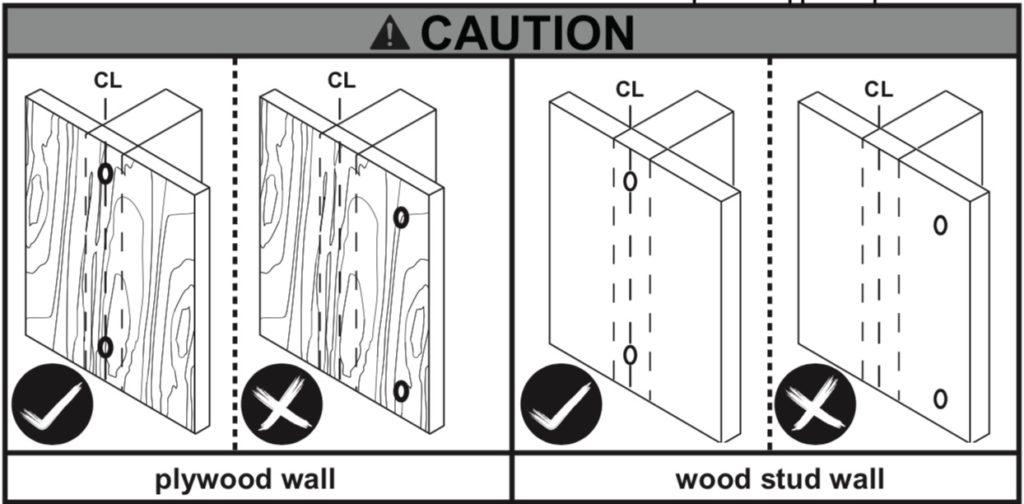
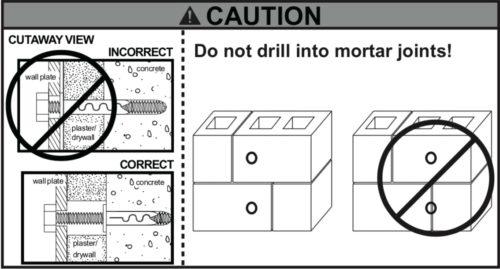
- If mounting to a wall of wood stud construction, be sure that mounting bolt are anchored to the center of the stud, when installing the TV wall mount on a concrete wall, the wall must be at least 8″(203mm) thick with a minimum compressive strength of 2500 to 3000 psi (17.2 to 20.7 MPa), the concrete wall must meet ASTM C39. When installing the TV mount on a cinder block wall, the cinder blocks must meet ASTM C216 specifications and have a minimum nominal width of 8” (203mm). Be sure to mount in a solid part of the block, generally 1″(25 mm) minimum from the side of the block. Do not drill into mortar joints! If plaster/drywall is thicker than 16mm, custom fasteners must be supplied by the installer
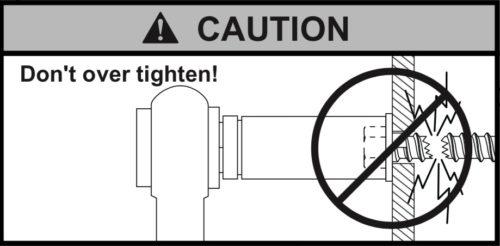
- Ensure you receive assistance during installation i.e. in lifting the equipment and also tighten the screws but not over tightening.
- Do not attempt to adjust the spring on bracket (part FF) before mounting, read manual carefully. A replacement will be chargeable.
Ensure you have the following tools before installation
Screwdrivers, pencil, measuring rule, spanner, hammer, hacksaw
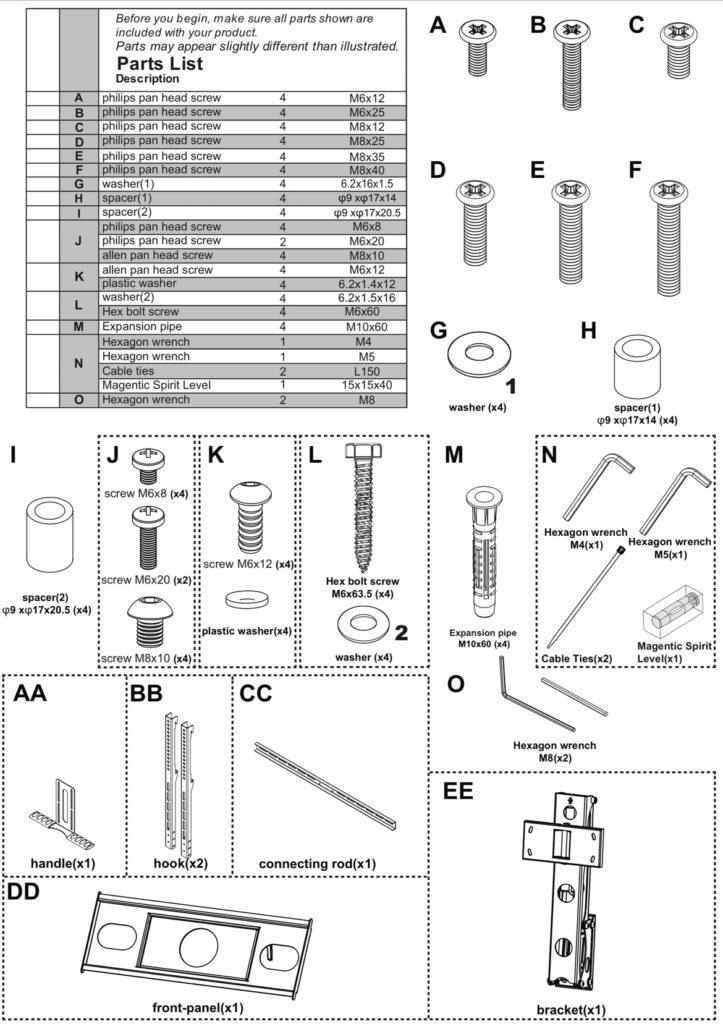
Ensure that all parts of the product are included in the product package

Installation requirements
- This procedure requires at least two people in order to complete the task i.e. bracket installation. Ensure the supporting surface will be able to support the load that is going to combined load of the equipment.
- In case the equipment is installed next to the fireplace the maximum temperature should never exceed 110° F (43).
- In case the mounting wall is made of wood, then it should include at least two studs. The covering wall should not be more than 16mm thick
- The mantle should never extend mounting surface in more than 356mm.
- The weight of the television should be between 7.5 – 32kg and 40 to 65 inch which should be confirmed by TV owner’s manual
- The wallboard should be shorter compared to the space above the mantle. All this range depends on how far the mantle is stretched. Refer to chart below and add this additional height to wallboard height to determine if space is tall enough.
| If mantle extends: | Required space height: |
| Less than 203mm | TV wallboard height plus 102mm |
| 203 – 254mm | TV wallboard height plus 127mm |
| 254 – 305mm | TV wallboard height plus 178mm |
| 305 – 356mm | TV wallboard height plus 203mm |
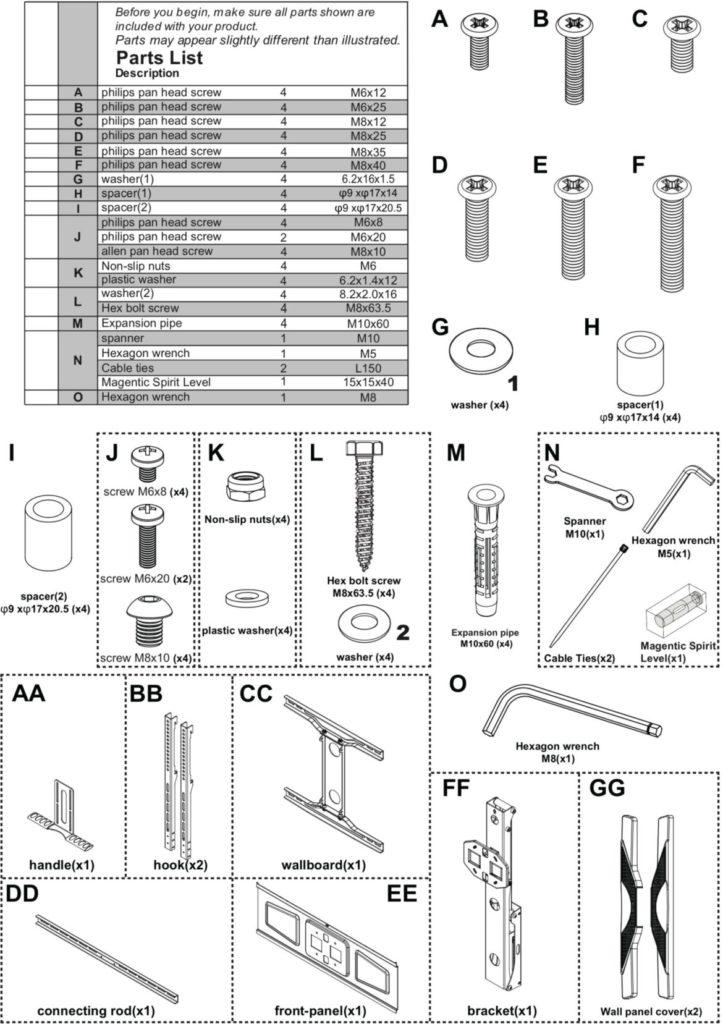
Swing out drawing
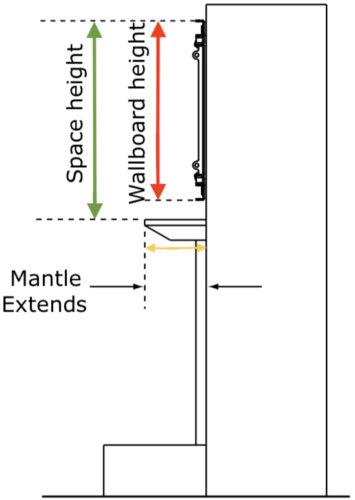
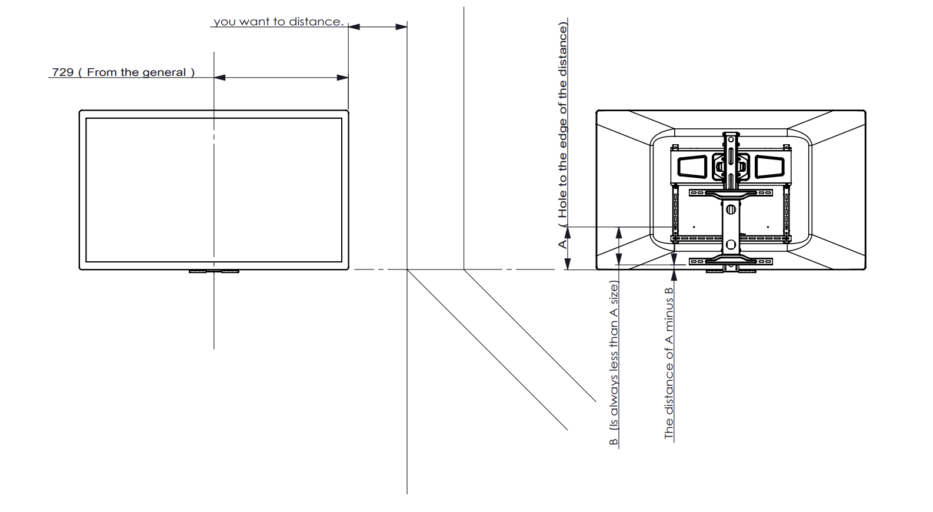
The above image is a rough guide for working out the TV drop position, as the VESA holes location on the back of the TV are different from TV to TV..
Installation procedure
- Installing the TV wall mount bracket
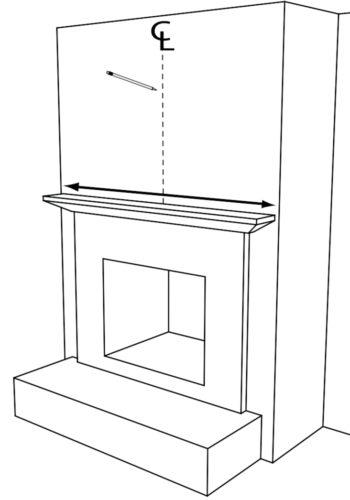
- Measure the centerline of the mantle and the area found and mark with a tape. It should be 600m above the fireplace.
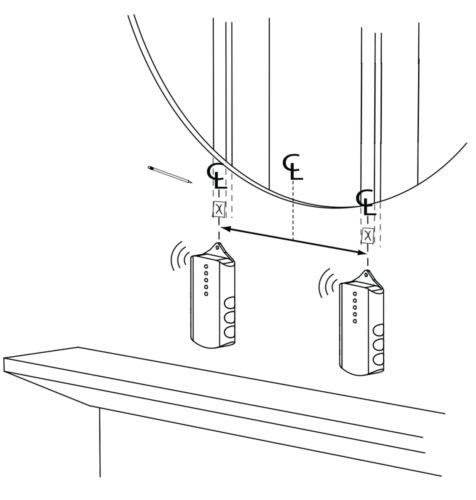
- Plasterboard walls ONLY – Using the stud finder, locate at least two studs and finding their center using a sharp awl to locate each edge lag bolt should be installed in the center of the studs
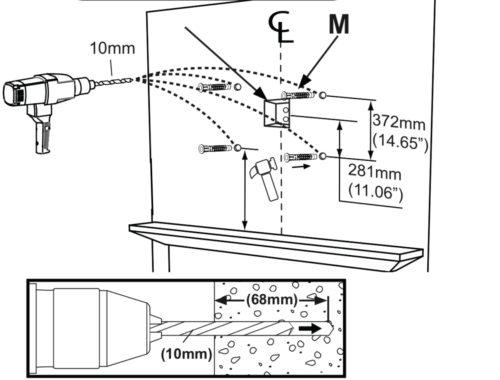
- One should ensure there are no big deviations between the holes which need to be 10mm
- In case the wall is concrete, use an expansion pipe. (In order to have a better installation, it is necessary to have in-wall wiring or wall AV and power plates installed to hide the cords behind the wall. We advise you get a professional installer to do this)
Plasterboard
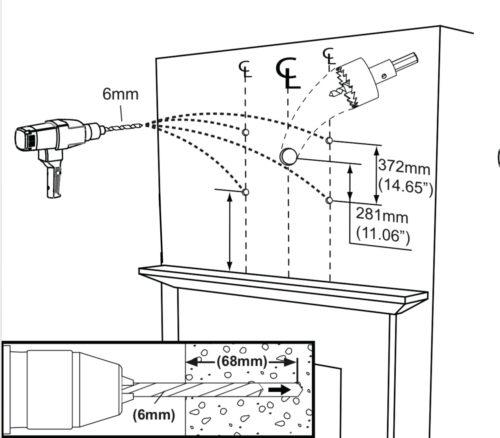
Concrete
TIPs
- As illustrated take out wallboard, hex bolt screw and spanner from packaging and let the pre-set wire go through the hole
- Take out K/EE/FF/N(spanner M10) from the packaging, installation as illustrated in the picture
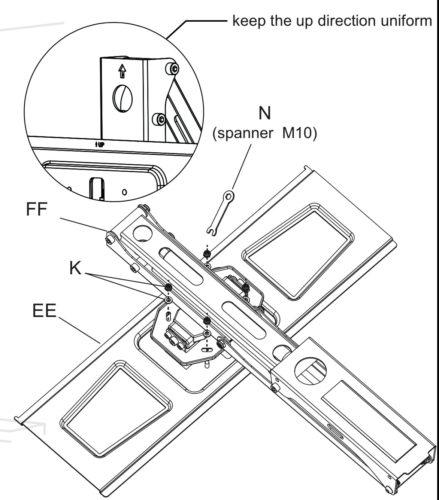
- Take the nuts, front panel, bracket and spanner from installation to assist in installation
TIPs
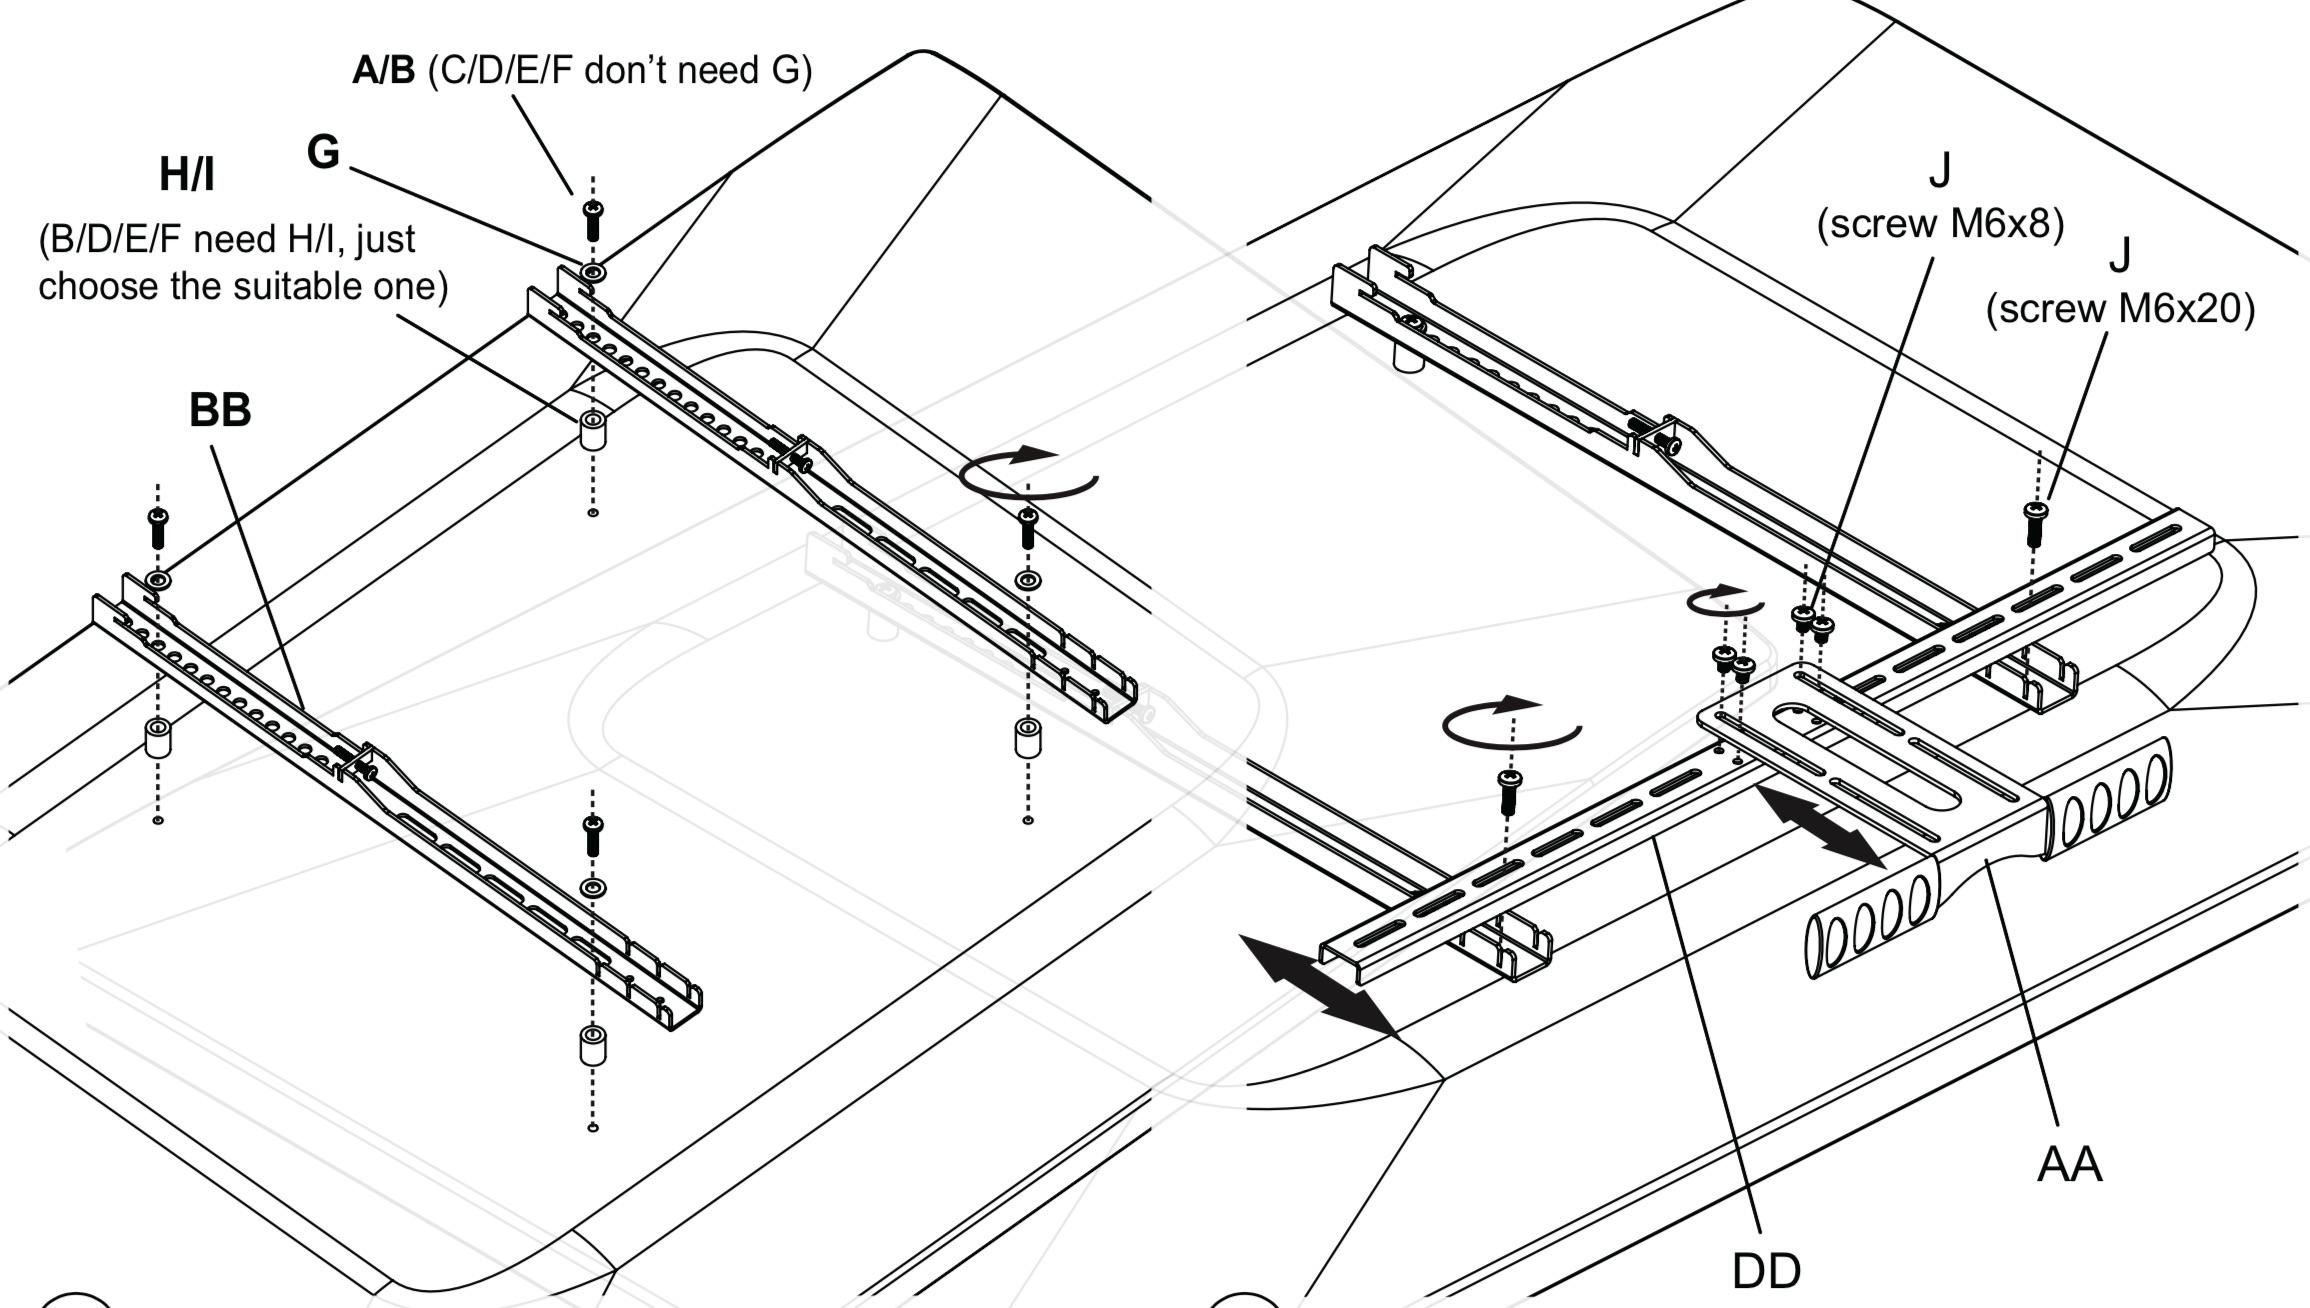
2. Installing the TV screen and adjusting the spring pressure
- Do selection depending on the TV situation. Pan Head screw +washer; or pan head screw and washer and lock with cross screwdriver.
- Take out Philips pan head screw, handle and connecting rod from the package in accordance with the TV set, adjust to the correct location and then lock with screw driver
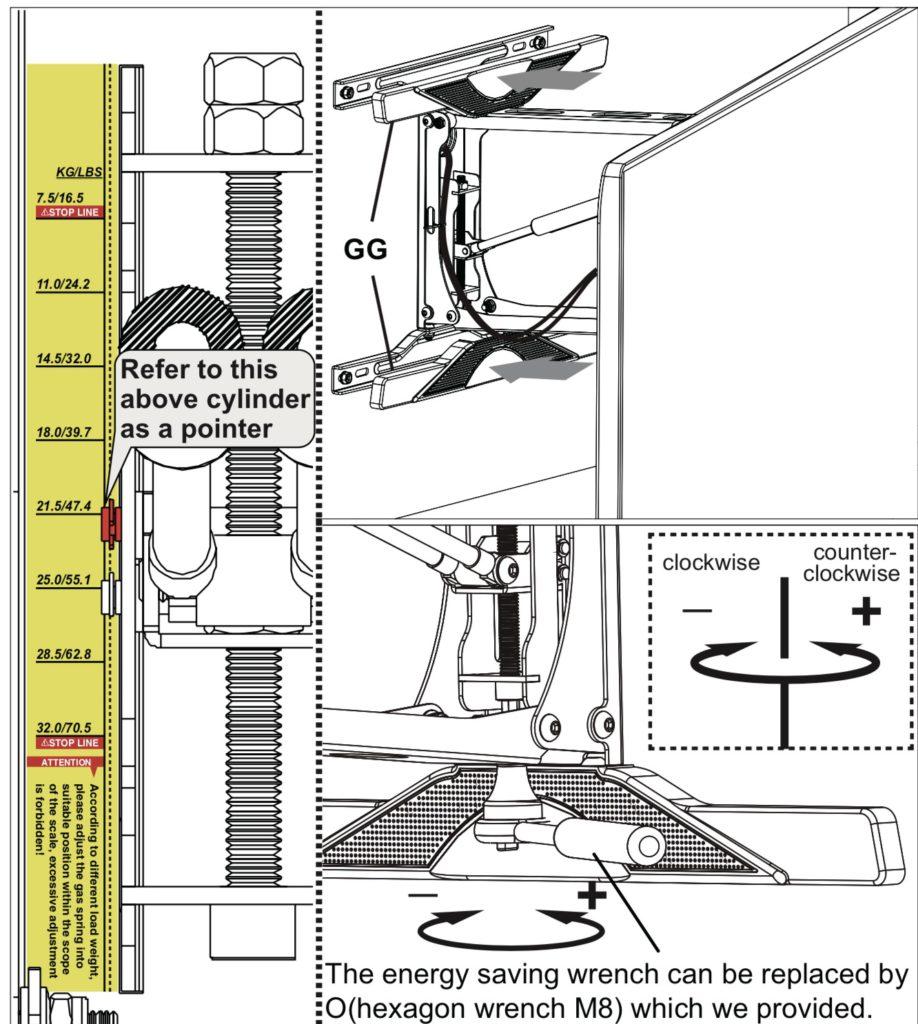
- Adjust spring pressure to appropriate level (Check TV Manual for correct TV weight without stand) with energy saving wrench.
- Lift the TV through hooks on the bracket and use a cross screw driver to lock the anti-off screws
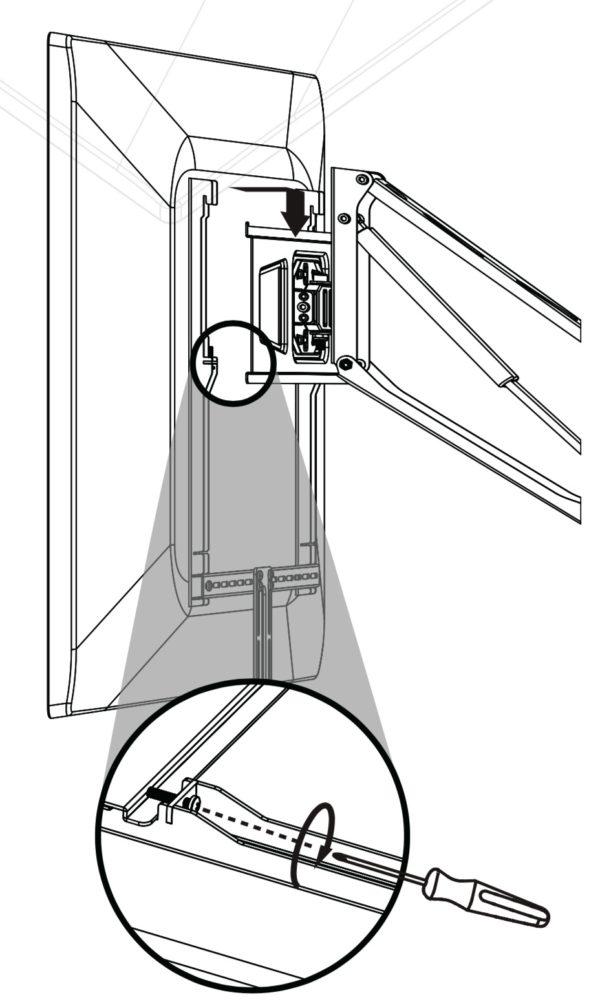
- Install the wall plate covers by clipping them onto the wall plate (They can be painted to the colour of the wall).
FAQ
Work out with the bottom of the television when mounting the TV wall mount above the fireplace.
This TV wall mount Installation guide
Wall bracket, which is the most important part of the Tranquil Mount
Bracket-rises and lowers the TV
The hooks, fitting rod
First mark the center line of the wall panel where the TV will be mounted on above the
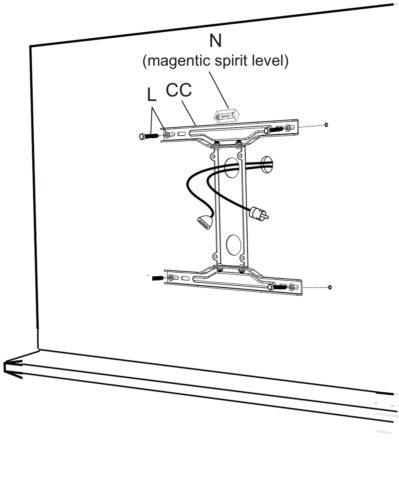
Use the spirit level to mark the area of the wall bracket to find the center of the wall
Bottom of bracket should be 600 mtrs above the fireplace
Ensure the centerline is shown in the holes on the wall bracket
Put the spirit above on top of the wall bracket while holding it on the wall to ensure that you have 100% level
Also ensure the bottom is lined with the centre line initially drawn on the wall
When the spirit level is 100%, the centre line passes through the centre of the two holes of the wall bracket,
mark the mounting holes on the four corners of the wall bracket for your fixings
Use the 10mm plugs and the 10mm bolts supplied
For the concrete walls, you can drill the 8 mm holes and use the concrete nails
Drill the 10 mm holes first and then put the 10mm plugs
Mount the wall bracket and then insert the bolts; ensure that the centerline passes through the wall bracket holes before fixing the bolts
Join the bracket to the crosspiece and tighten using the small nuts provided
Use the small spanner provided to tighten the nuts joining the crosspiece and the bracket
Ensure the hook bars are not fixed below the TV
Use the washer and the nuts to screw the hook bars to the back of the TV
Also, ensure the screws at the back of the hook bars are undone for fixing the TV to the crossbar
Use the shorter screws to connect to the handle to the connecting rod already fixed to the hook bars
Slot the four mounting holes on the bracket to the bracket on the wall and the fix it in place with the screws that have been supplied in the box
The arrow written up on the cross bars confirm that the right connection has been realized
The calibration gauge for the television will give information on the adjustments to be made depending on the size of the TV
- The hooks on top of the hook bars are for hooking the TV to the bracket on the wall
Posted in Mount.
How To Install TV WALL MOUNT – Tranquil Mount TMO400B
TV WALL MOUNT INSTALLATION GUIDE
Tranquil Mount Model: TMO400A
Support 32″ to 50″ TV Screens
Load Capacity: 13.5-65 lbs (7~30 kg)
Compatibility Guide
TV VESA: 100x100mm, 200x100mm, 200x200mm, 200x300mm, 300x300mm, 400x200mm, and 400x400mm.
TV Weight (Without Stand): 7~30 kg [Once installed, Mount spring can be adjusted for the required weight]
TV Size: 32″ to 50″ (Recommend for LG TV models 32″ to 65″, use TMO400A))
Important Things to Note
- Before any attempt on installation is done, the user should be able to read thoroughly and ensure that he or she understand the manual
- Tranquil Mount Ltd will therefore not be liable in case of on any damage done to either the TV or the wall since the manual require the installation to be done by a qualified personnel
- Serious damages on either the wall or the television may be encountered in case the manual is not followed to the latter. The manual provides correct procedures to be followed during installation to avoid any damages that may occur
- Avoid your hands from moving back and forth in the bracket to prevent them from getting trapped and thus causing damages. Keep the product out of reach of children
- The product should be installed by at least someone with a basic knowledge in the building construction and has a clear understanding of the instruction in the manual
- With a maximum capacity of the wall bracket hitting a maximum of 32kg a weight above that may result in damages
- If mounting to a wall of wood stud construction, be sure that mounting bolt is anchored to the center of the stud, when installing the TV wall mount on a concrete wall, the wall must be at least 8″(203mm) thick with a minimum compressive strength of 2500 to 3000 psi (17.2 to 20.7 MPa), the concrete wall must meet ASTM C39. When installing the TV mount on a cinder block wall, the cinder blocks must meet ASTM C216 specifications and have a minimum nominal width of 8” (203mm). Be sure to mount in a solid part of the block, generally 1″(25 mm) minimum from the side of the block. Do not drill into mortar joints! If plaster/drywall is thicker than 16mm, custom fasteners must be supplied by the installer
- Ensure you receive assistance during installation i.e. in lifting the equipment and also tighten the screws but not over tightening.
- Do not attempt to adjust the spring on the bracket (part FF) before mounting, read manual carefully. A replacement will be chargeable.
Ensure you have the following tools before installation
Screwdrivers, pencil, measuring rule, spanner, hammer, hacksaw
Ensure that all parts of the product are included in the product package

Installation requirements
- This procedure requires at least two people in order to complete the task i.e. bracket installation. Ensure the supporting surface will be able to support the load that is going to a combined load of the equipment.
- In case the equipment is installed next to the fireplace the maximum temperature should never exceed 110° F (43). It should also not be on when the fire is burning.
- In case the mounting wall is made of wood, then it should include at least one studs. The covering wall should not be more than 16mm thick
- The mantle should never extend mounting surface in more than 350mm.
- The weight of the television should be between 6 – 30kg and 32 to 65 inch which should be confirmed by the TV owner’s manual
- The wallboard should be shorter compared to the space above the mantle. All this range depends on how far the mantle is extended
| If mantle extends: | Required space height: |
| Less than 180mm | TV wallboard height plus 135mm |
| 180 – 240mm | TV wallboard height plus 150mm |
| 240 – 300mm | TV wallboard height plus 195mm |
| 300 – 350mm | TV wallboard height plus 265mm |
Installation procedure
- Installing the TV wall mount bracket
- Measure the centerline of the mantle and the area found and mark with a tape. It should be 600m above the fireplace.


- Plasterboard walls ONLY – Using the stud finder, locate at least two studs and finding their center using a sharp awl to locate each edge lag bolt should be installed in the center of the studs

- Detach the plate from the arm, mark on the wall the install location. Use the supporting
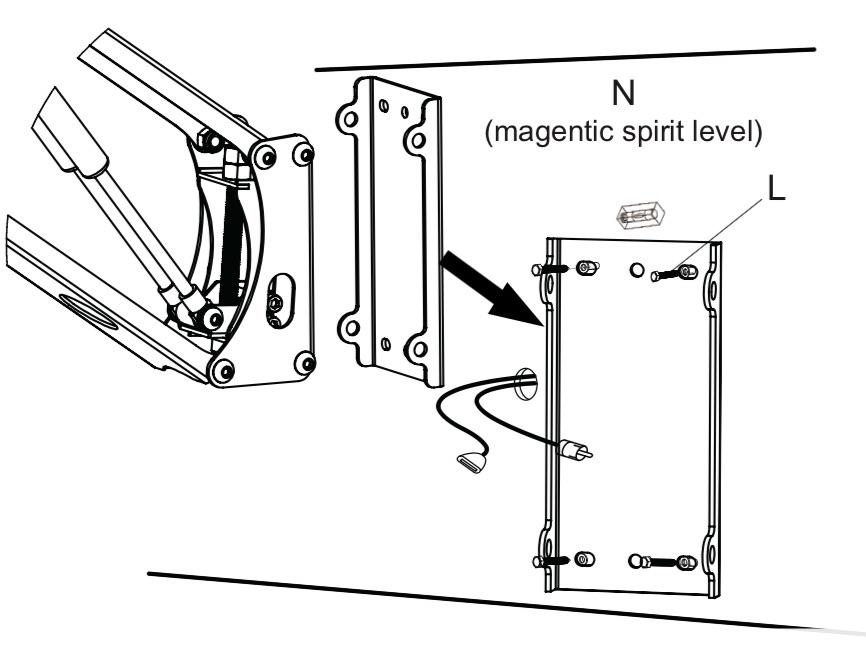
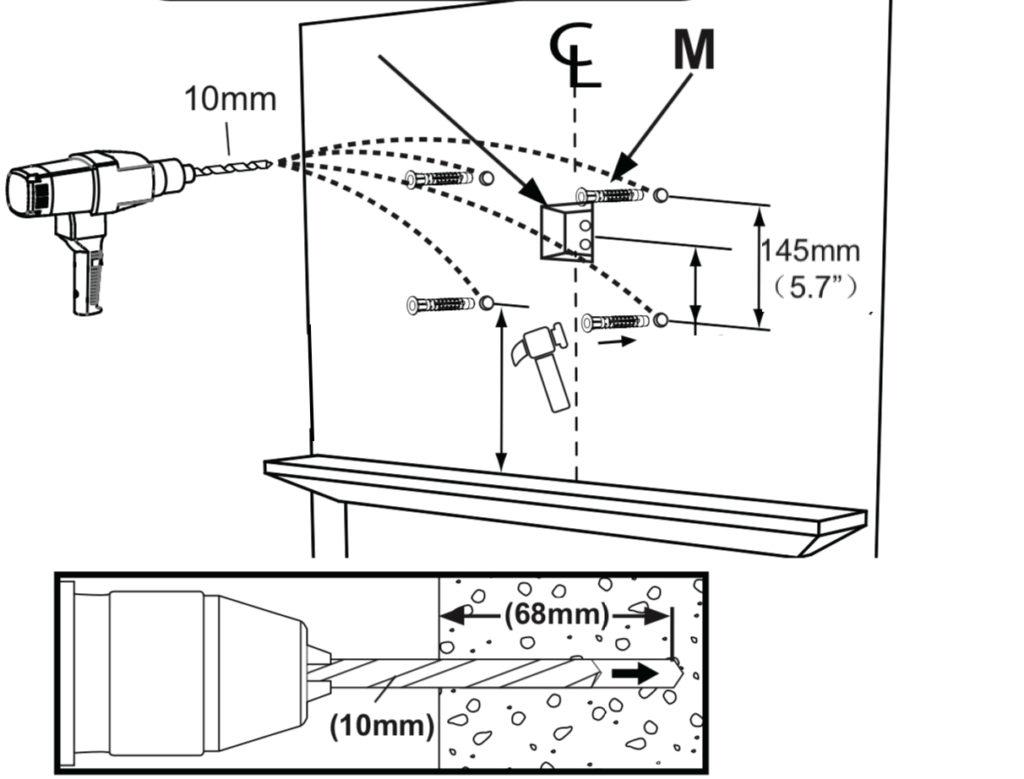
- One should ensure there are no big deviations between the holes which need to be 10mm
- In case the wall is concrete, use an expansion pipe. (In order to have a better installation, it is necessary to have in-wall wiring or wall AV and power plates installed to hide the cords behind the wall. We advise you get a professional installer to do this)
Plasterboard
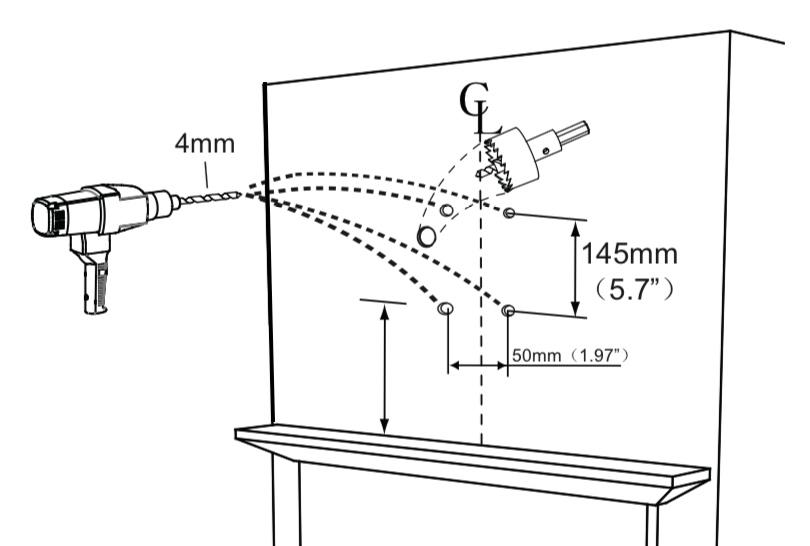
Concrete
TIPs


- As illustrated take out wallboard, hex bolt screw and spanner from packaging and let the pre-set wire go through the hole
- Take the nuts, front panel, bracket and spanner from installation to assist in installation
TIPs

- Finally taking out hexagon wrench from packaging lock the four head pan head screws (M8x10) with hexagon wrench use cable ties to up the wires.
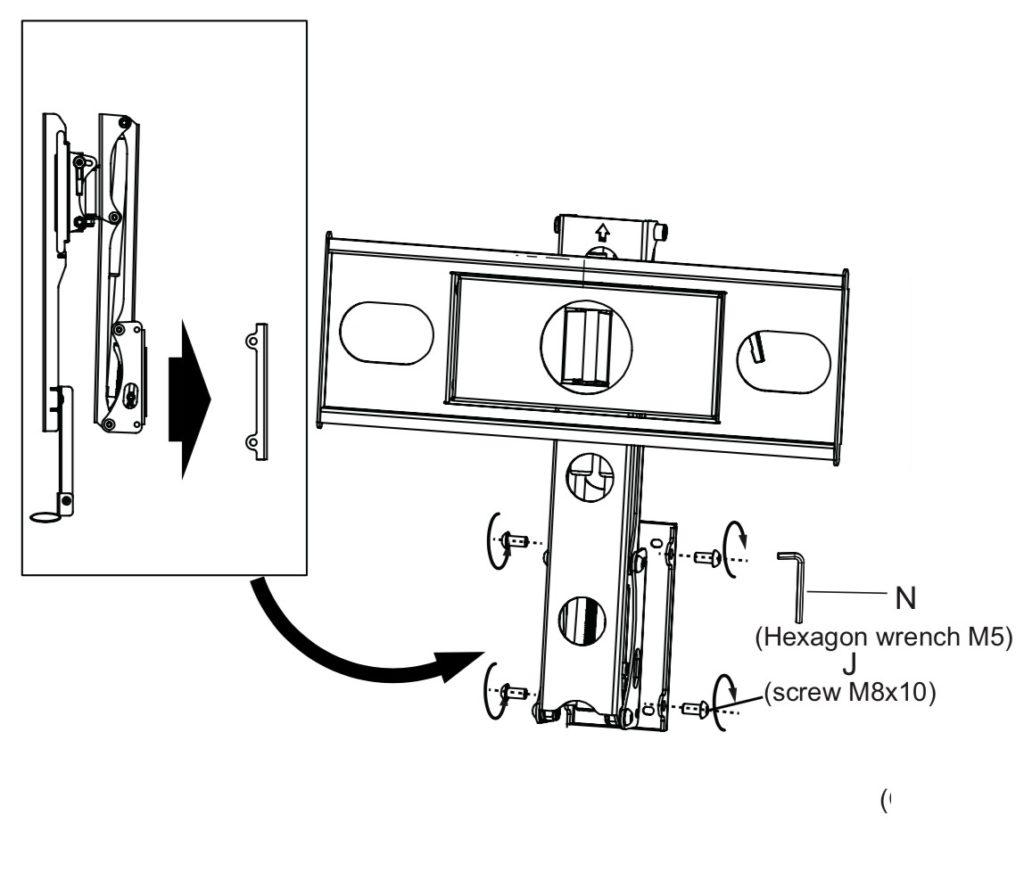
- Take out K/EE/FF/N(spanner M10) from the packaging, installation as illustrated in the picture.
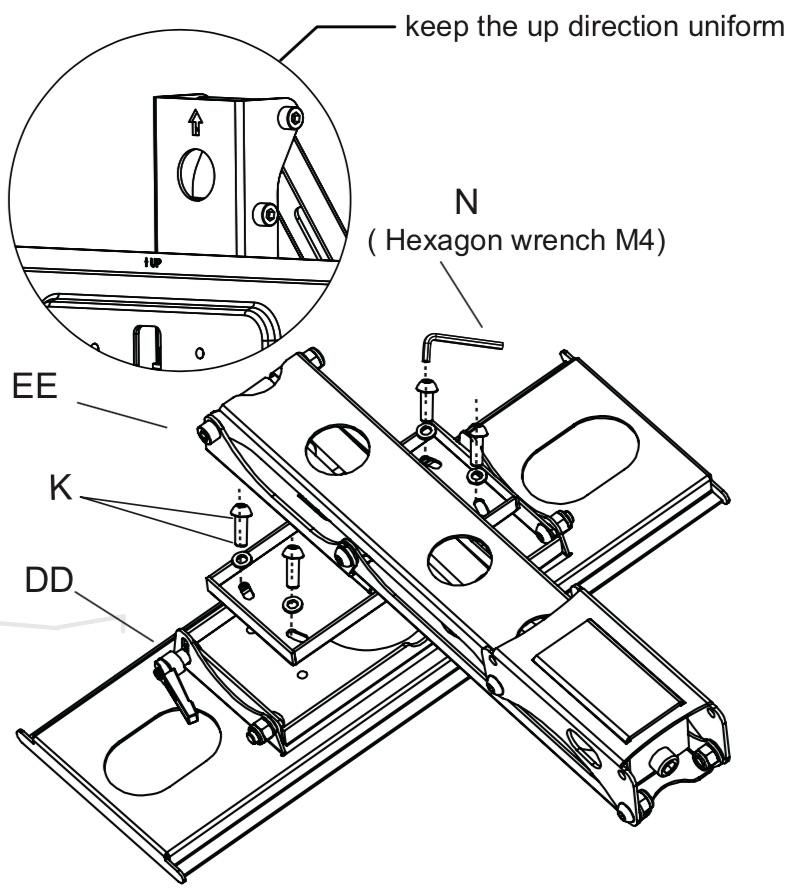
2. Installing the TV screen and adjusting the spring pressure
- Do selection depending on the TV situation. Pan Head screw +washer; or pan head screw and washer and lock with cross screwdriver.
- Take out Philips pan head screw, handle and connecting rod from the package in accordance with the TV set, adjust to the correct location and then lock with screw driver

- Adjust spring pressure to appropriate level (Check TV Manual for correct TV weight without stand) with energy saving wrench.

- Lift the TV through hooks on the bracket and use a cross screw driver to lock the anti-off screws
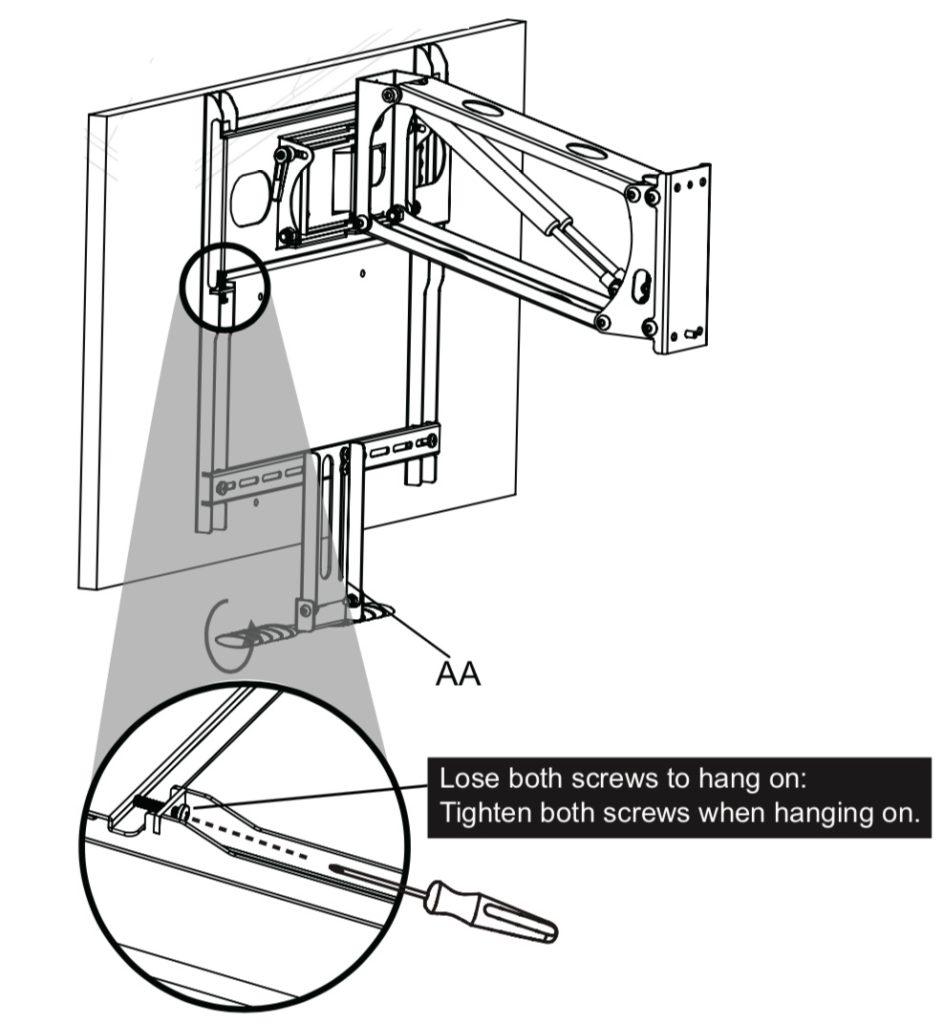
- Install the wall plate covers by clipping them onto the wall plate (They can be painted to the colour of the wall).
FAQ
Work out with the bottom of the television when mounting the TV wall mount above the fireplace.
This TV wall mount Installation guide
Wall bracket, which is the most important part of the Tranquil Mount
Bracket-rises and lowers the TV
The hooks, fitting rod
First mark the center line of the wall panel where the TV will be mounted on above the
Use the spirit level to mark the area of the wall bracket to find the center of the wall
Bottom of bracket should be 600 mtrs above the fireplace
Ensure the centerline is shown in the holes on the wall bracket
Put the spirit above on top of the wall bracket while holding it on the wall to ensure that you have 100% level
Also ensure the bottom is lined with the centre line initially drawn on the wall
When the spirit level is 100%, the centre line passes through the centre of the two holes of the wall bracket,
mark the mounting holes on the four corners of the wall bracket for your fixings
Use the 10mm plugs and the 10mm bolts supplied
For the concrete walls, you can drill the 8 mm holes and use the concrete nails
Drill the 10 mm holes first and then put the 10mm plugs
Mount the wall bracket and then insert the bolts; ensure that the centerline passes through the wall bracket holes before fixing the bolts
Join the bracket to the crosspiece and tighten using the small nuts provided
Use the small spanner provided to tighten the nuts joining the crosspiece and the bracket
Ensure the hook bars are not fixed below the TV
Use the washer and the nuts to screw the hook bars to the back of the TV
Also, ensure the screws at the back of the hook bars are undone for fixing the TV to the crossbar
Use the shorter screws to connect to the handle to the connecting rod already fixed to the hook bars
Slot the four mounting holes on the bracket to the bracket on the wall and the fix it in place with the screws that have been supplied in the box
The arrow written up on the cross bars confirm that the right connection has been realized
The calibration gauge for the television will give information on the adjustments to be made depending on the size of the TV
- The hooks on top of the hook bars are for hooking the TV to the bracket on the wall
Posted in Mount.


