Video Wall Digital Signage

Video Wall

What is a display wall (Video Wall)?

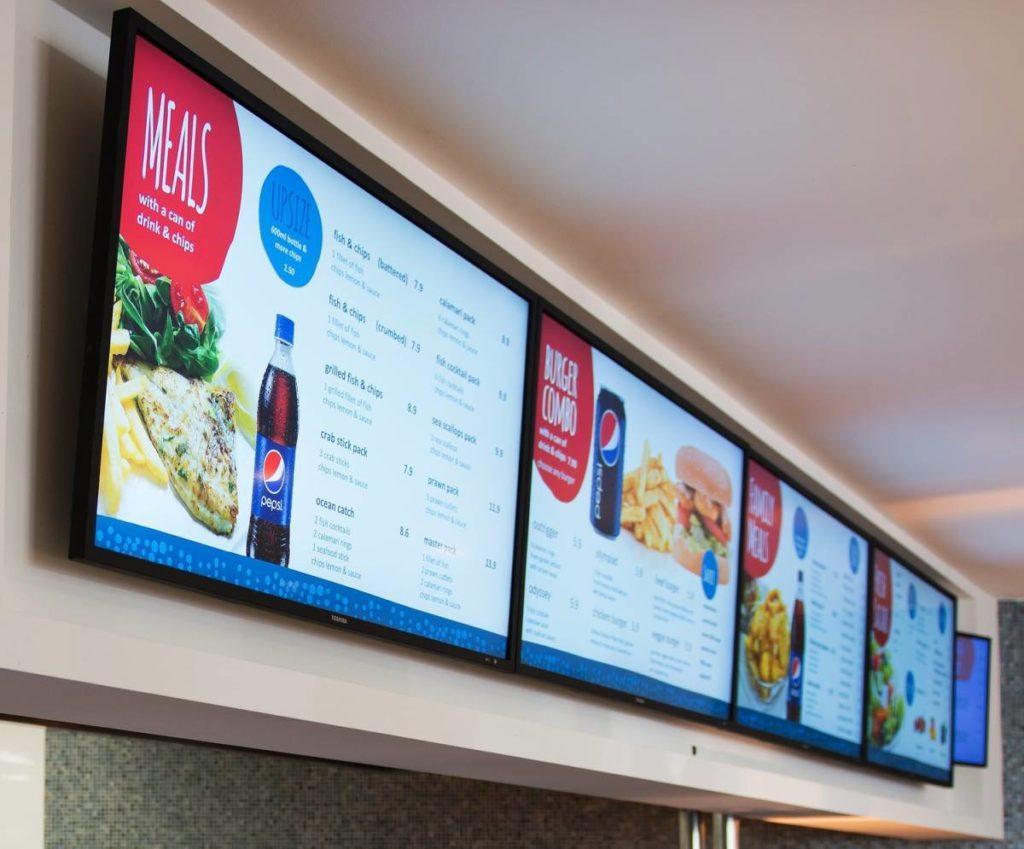
A display wall / Digital Signage (also known as a video wall) is a large surface containing numerous displays. They were initially several televisions or screens put together to make it seem like one large screen using Video Wall mount i.e 4×2 video wall.

New thin edge technologies were introduced to minimise the hidden space between the multiple screens. Now, wall solutions are generally using tiled LCD panels, projection, or direct LED tiles.

These display walls are available in many sizes, usually with a diameter from 46″ to 80″. But the choice of the screen size depends on the specific content and the viewing distance. The resolution depends on the size of the Video wall.

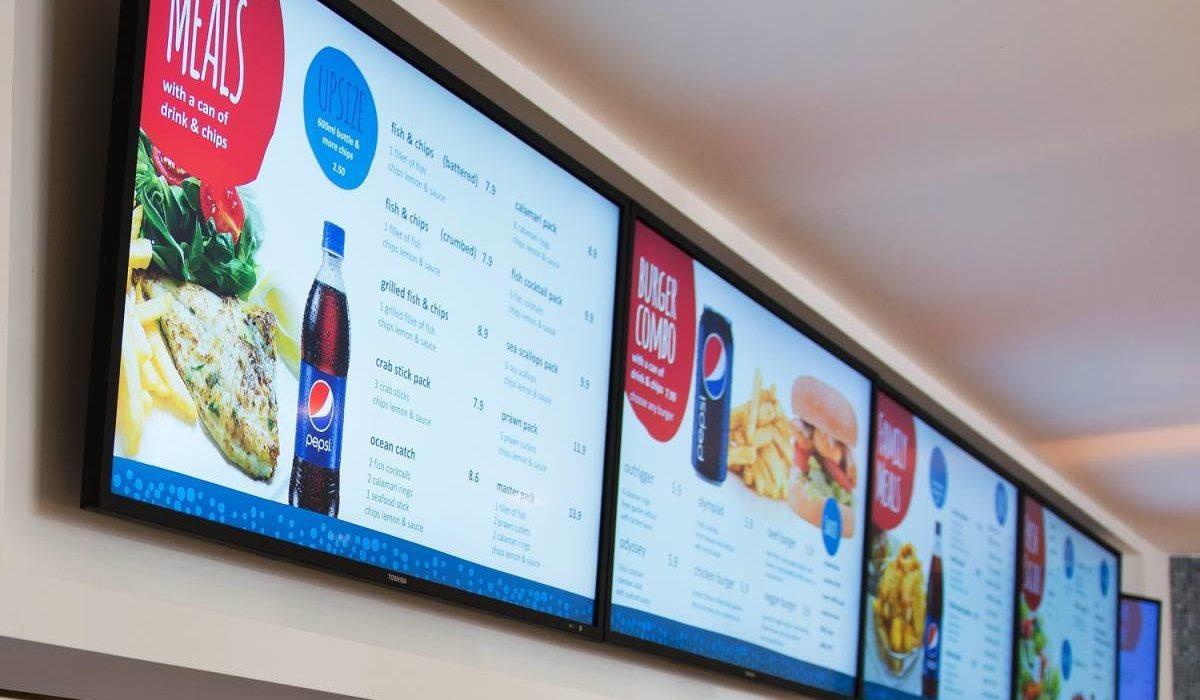
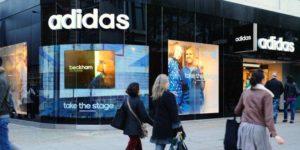
Video LED Walls are mounted in meeting rooms, control rooms or for display and advertisement.

Example LED Wall Configurations

4×2 video wall, 2×2 , 3×3 ……. and so on 4×4

Common traits:

  • Wall Video controller to get content on the screens
  • Digital Signage
  • Calibration mechanism to ensure every tile have the same brightness and colour settings. 
  • Minimal inter-tile gap (or ultra-narrow bezel) to counter the ‘raster effect.’
  • Flexible regarding the number of LEDs (screen size)

About LCD walls

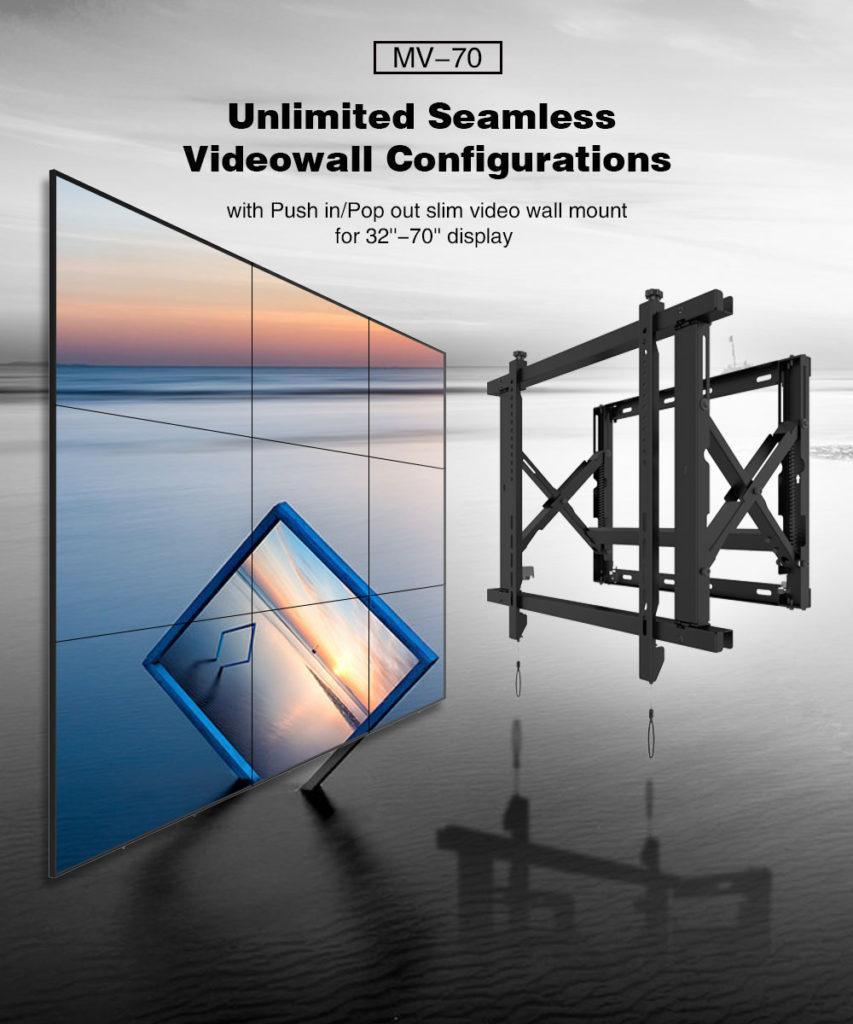
LCD wall consists of multiple specifically designed LCDs, these LCDs have a very narrow bezel. The LCD display wall minimizes the gap between the panels, making it look like one big canvas. Today, Tranquil Mount MV70 has the smallest gap between the panels.

In addition, LCD display walls are designed for long term use. Specific measures are applied to prevent burn-in effects from allowing them to play for many years, in optimal conditions. In some cases, they continuously play in a 24/7 mode, which means they are rarely switched off. 

Display Wall Solutions’ traditional benefits include the high brightness, acceptable image quality, and relatively low cost. The disadvantages are the risk of burn-in and the lower lifetime. However many LEDs today have tackled that problem, so there is no worry of burn-ins happening.

Typical markets for LCD walls include meeting and crisis rooms, lobbies, and experience centres. They are also found in control rooms of traffic and security centres.

Rear-projection

Now using projection, rear-projection video walls target different applications. They are optimal for 24/7 use. Utility providers mostly rely on technology to monitor networks. 

A rear-projection video is a wall that consists of multiple cubes, which contain a projector and a screen. The projectors are tilted towards a mirror under a 45° angle reflects the image onto the screen. This means that the required depth is cut dramatically. The Projection can also be serviced from the front, so there is no need for a rear maintenance area.

This technology’s benefits include the very high runtime, an absence of burn-in, and a narrower gap between cubes. Traditional drawbacks are the limited brightness and the real estate space used.

LED Display walls

Direct view LED technology is used to create the most intricate video walls. Live performances use LED video walls to add effect. The LED display tiles contain many individual colour LEDs.

The high brightness, absence of gaps between the screens and impressive colours are the main benefits of this technology. The disadvantages are high cost and power consumption.

LED Manufacturers/Digital Signage

LG Digital LED

LG Video wall technology offers high picture quality and performance perfect for advertisements, information, menus, and broadcast videos.

Samsung LED

Samsung offers edgeless, Razor & Extreme Narrow Bezel for Premium video wall solution with incredibly narrow bezel for seamless picture quality and performance. That is a video wall that is sure to make an impression on your intended audience.

Sharp LED

Truly an innovative and unique SHARP video wall display mainly designed for video wall applications and multi-screen installations. Sharp’s Advanced UCCT (Uniform Colour Calibration Technology) guarantees a perfect white point and colour uniformity for every display making up the video wall.

Panasonic LED

Video wall Display High Pixel density and Built with ultra-narrow bezel and high-brightness, a robust design, an outstanding picture quality and wide viewing angles (direct LED back-lit IPS panel).

Digital Signage Software and Hardware 

Datapath Software Solution

Datapath has a range of software tools to plan, execute and manage complete Display wall set-ups. Whether there is a small wall in a single location or multiple large walls across some sites, Datapath has several applications to manage, find faults and stream sources when using video walls.

Useful Wall Mount Solution

A Video Wall Solution For Those Who Care About Reliability, Management, And Scalability.

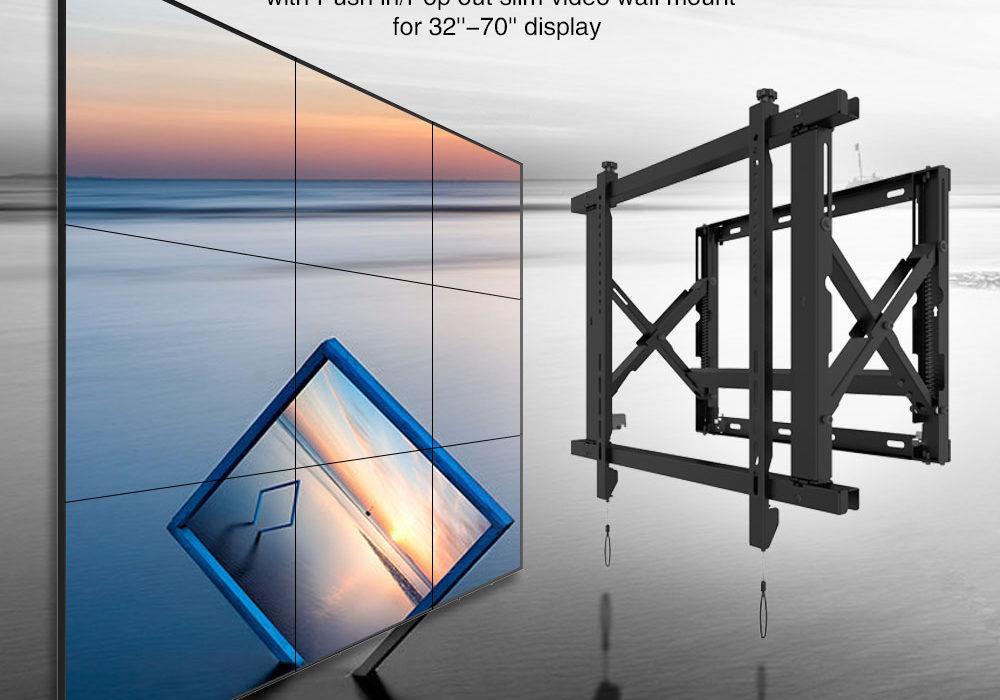
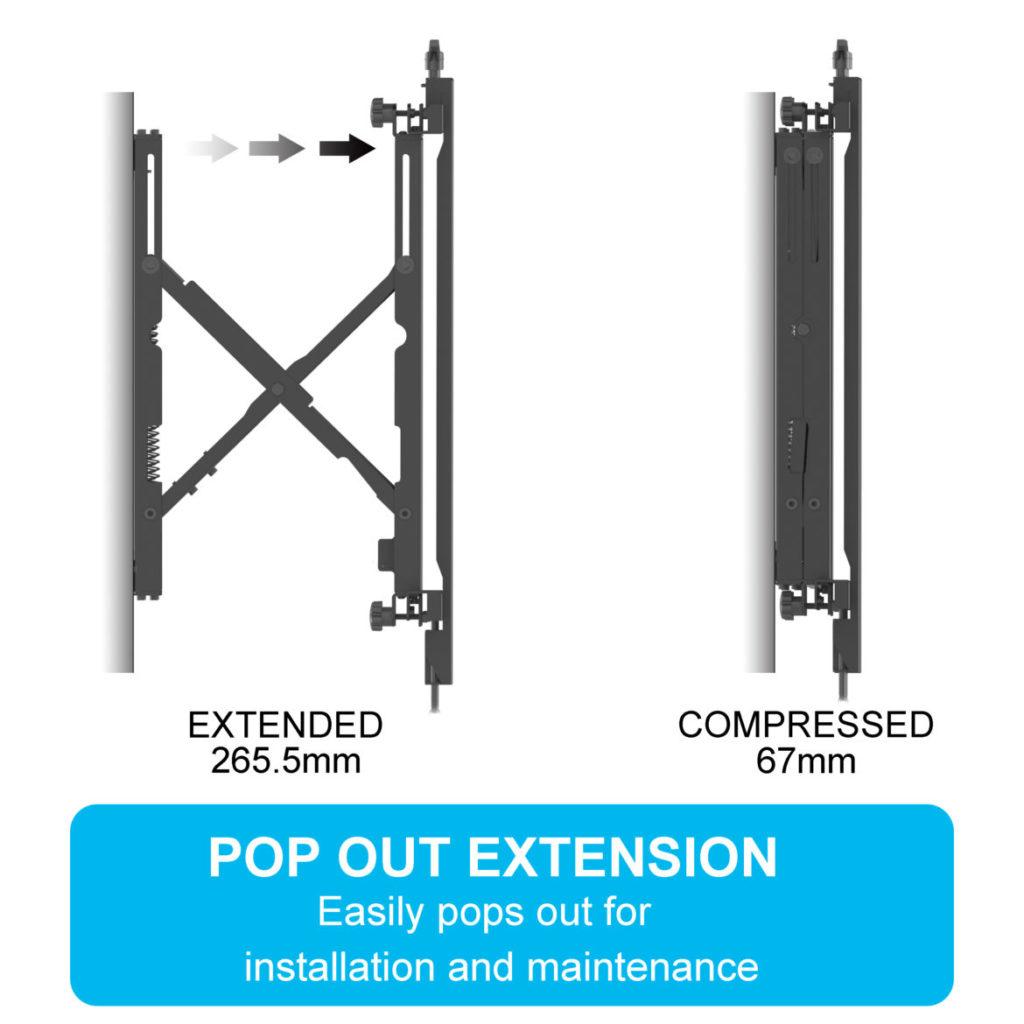
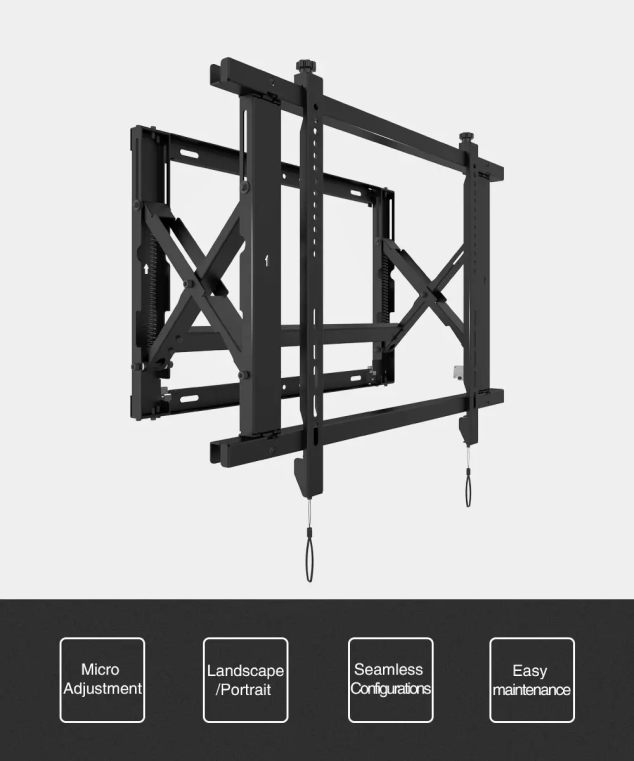
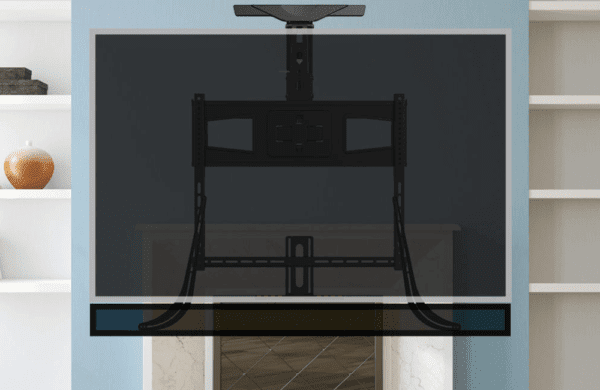
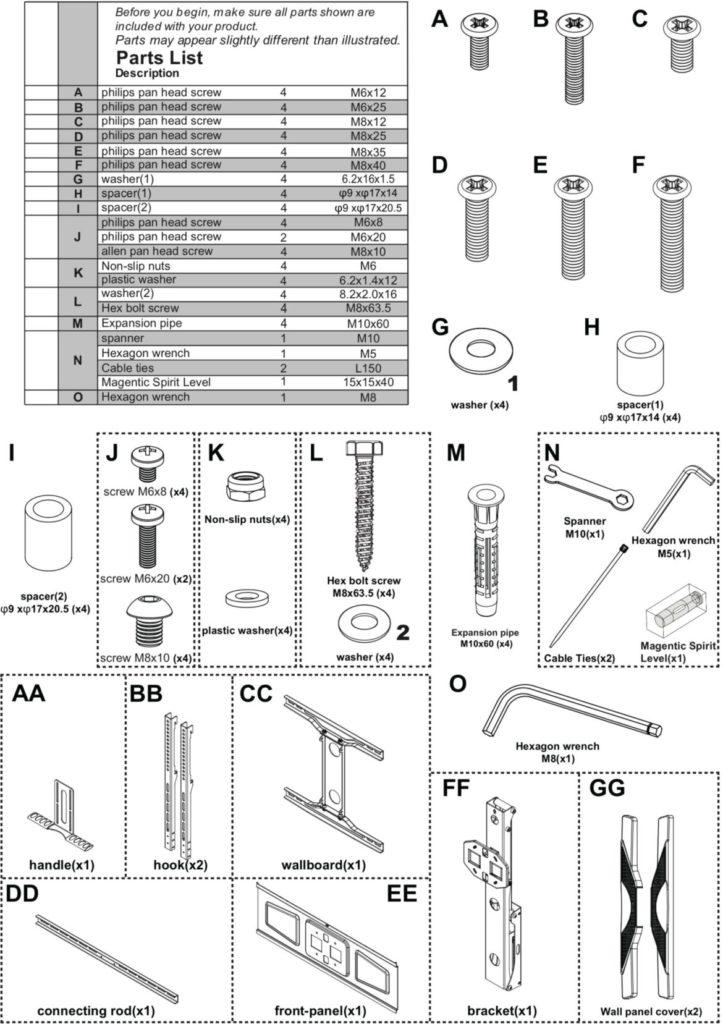
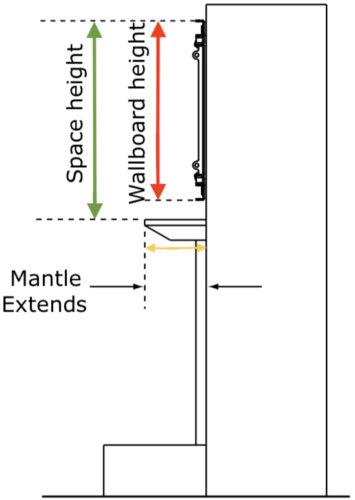
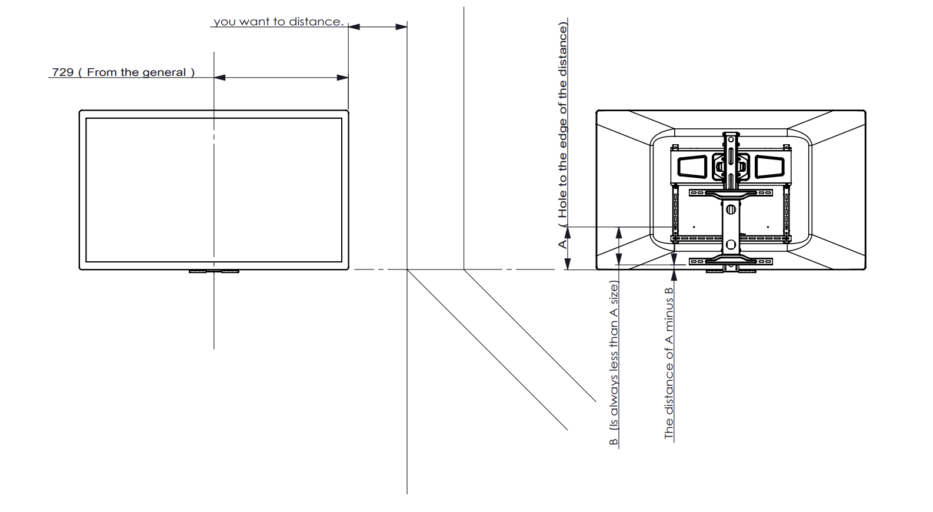
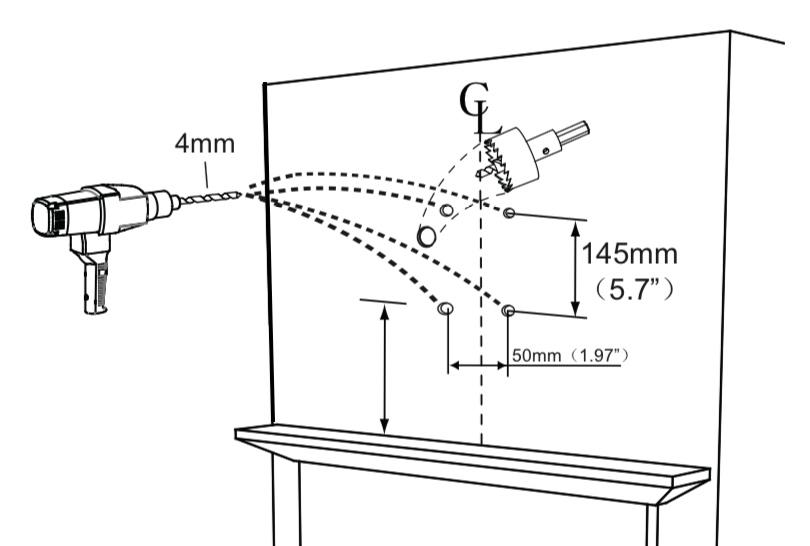
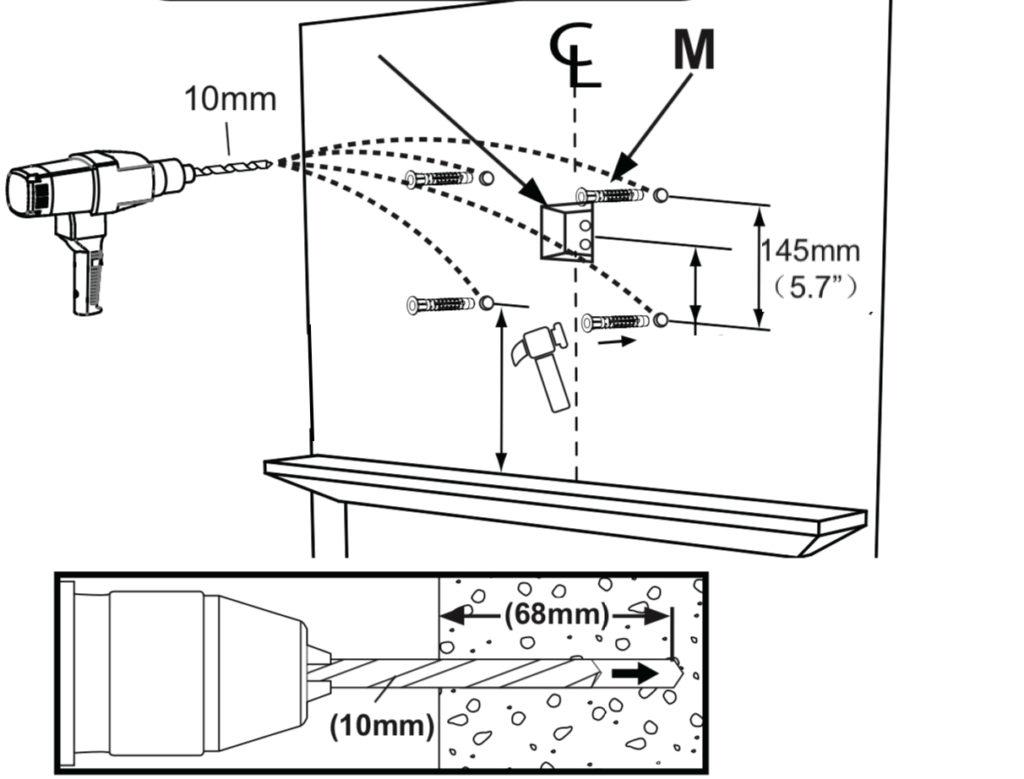
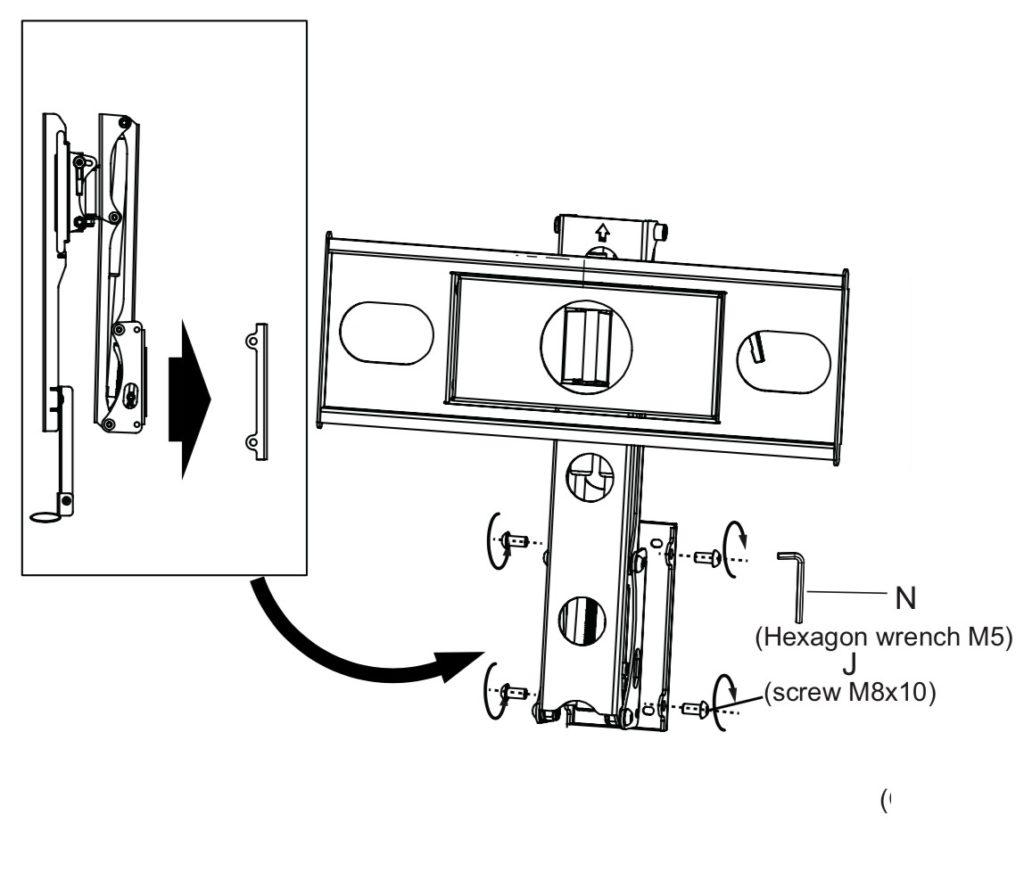
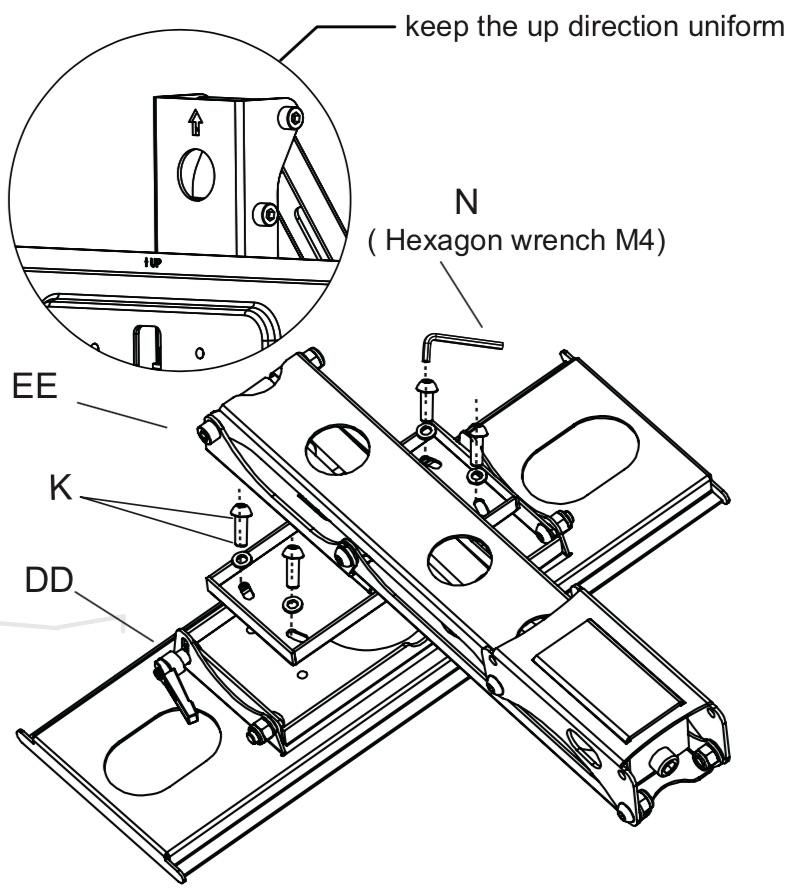
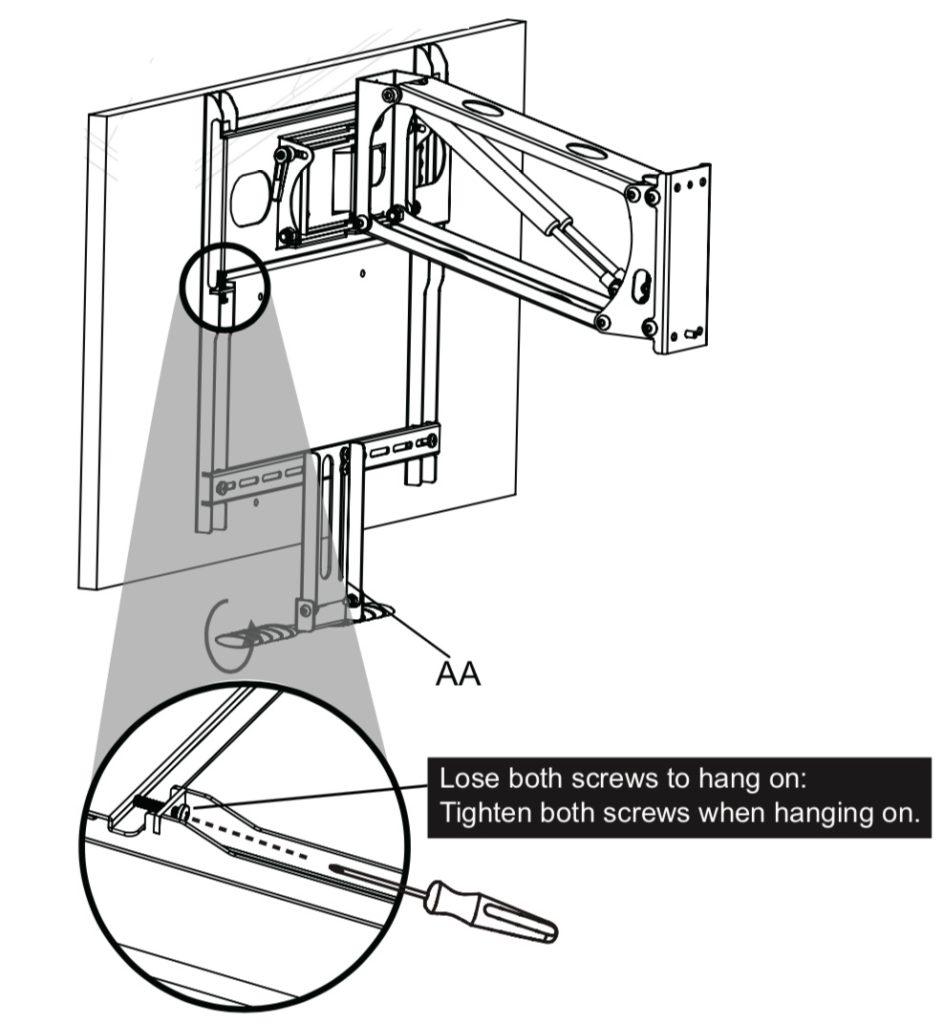
Digital Signage Mounting Kit

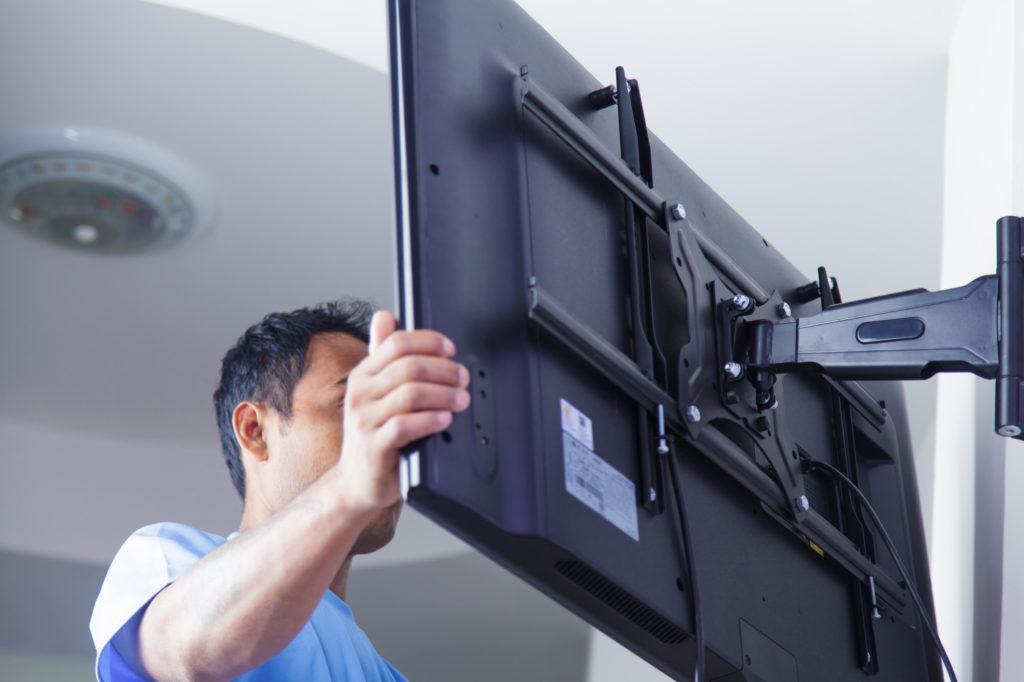
Tranquil Mount MV70 Video Wall Mount Offers Precision Mounting Solutions For LEDs And LCDs That Is No Like Other. It Also Offers Easy Access To The Video Display For Configuration And Cabling.

video wall mount commercial

Screen resolution

A factor affecting the cost of the wall solution is the resolution of the LED screen. Resolution is determined by the number of pixels in a fixed area. A higher count of pixels will produce an image with a higher resolution.

The audience’s distance determines the decision of what resolution you need to the led screen. The further the screen from the audience, the lower your resolution needs to be (like a concert, for example.)

LED screens with a higher resolution can dramatically increase the price too. These screens require high-end processors to produce imagery at a higher resolution. So if you choose to change to a higher-resolution display, the LED screen’s cost and its usage cost will increase.

Video Wall Digital Signage
Digital Signage Video Wall
Video Display
video wall mount commercial

All You Need To Know About Using a Video Wall Mount

Installing mount TV on the wall at home or office

Thirty-four years – that’s how long the average adult will spend staring at a screen in their lifetime.

You can use the world’s affinity for screens to your advantage, whether for yourself or for your business. Build a video wall to draw eyes to multiple pieces of media that you want to share — or want to see yourself. 

Of course, you can’t create a video wall without installing a few screens side by side by side. You just need to get a few video wall mounts and learn how to adhere them to the wall. 

We can help you with that. Here’s how to mount a TV on the wall as part of your video facade. 

Video Mount MV70
Video Mount MV70

Know What You Want First

Before you can helm your wall-mounted TV installations, you need to know how you will use the wall. 

Will you use each screen to display something different? Or do you want a single picture stretched across multiple TVs? 

To do these things, you’ll need more than just a wall mount for your TVs. You’ll also need to install a video wall processor, which can help you set the positions and sizes of what you play on each screen. 

Let’s say you want to draw media from different sources, such as streaming data, 3D, computer data, etc. You will need a multi-window processor to make this vision a reality. 

You will need to know beforehand if the wall will be interactive, as well. It’s easy to figure this out. Will you touch the screens to move content around or pull and stretch it to different screens? 

Answer these questions before you learn how to mount a TV. You need to come up with a plan of action before you start with the physical labour. 

Choose the Right Mount

Now that you’ve designed your video display and created the content to fill it, you can move on to selecting your electronics. You can also choose the wall mount to hold everything in place. 

The structural integrity of your wall-mounted TV installations should be of the utmost importance. You don’t want it to crumble and fall on someone down the line. 

So, choose a mount with replaceable parts. Even a high-quality system will lose its strength over time. If you can replace parts, though, you can maintain the structure for as long as possible. 

The wall needs to be strong, too. So, have a pro inspect the structural support behind the wall where you want to install a wall-mount display. 

Ventilate the Space

You can’t hang your video wall mount in a space without ample ventilation. Think about it: lots of TVs will create quite a bit of heat that needs somewhere to go. Otherwise, it could spell trouble for your display. 

So, choose a spot that gets plenty of airflow, or create the ventilation yourself with fans and vents. This step is crucial in your planning because it will likely factor into your budget and bottom line. Count it into your costs or risk running out of cash mid-project. 

Check the Electrical Supply

You’re hanging up a bunch of new TVs. How will you power them all? 

Make sure you have the wattage to run a video display through your wall-mounted TVs. On top of that, safeguard your new TVs with a surge protection system, just in case there’s unexpected flux in electricity. 

Mount the TVs

Now that you’ve done the groundwork, it’s time to hang your TVs. 

Your best bet, of course, is to hire a professional to take care of this job for you. This tip is especially true when it comes to wall mounts.

A pro will know how to level everything out so your TVs are evenly spaced. The technician can also take care of the preventative steps as listed above. They’ll check the ventilation, set up surge protection and more. 

However, if you want to hang your video wall mount on your own, here are the basic steps to take

1. Map Out the Wall First

Need help visualising your wall-mounted TV installation? Use paper.

Yes, you can — and should — cut out pieces of paper the size of your TV(s) and hang them on the wall where you want the screens to go. 

This will help you hang them at the perfect height. Plus, you can level off and space out your cardboard papers so that your TVs will hang this way, too. 

2. Find the Studs

You will want your TV wall mounts to hold onto a stud for added support. So, find the studs in your walls and mark them so you can hang your mounts safely and securely. 

3. Mark the Pilot Holes

Align the pilot holes on your mount to the stud. Mark the two holes at its center, where you’ll attach the mount to the support beam. 

Rely on your level for this step so that your markings are balanced — you don’t want to realise you have one crooked TV after you drill holes. 

4. Hold Up the Mount

Don’t drill anything yet. Instead, use your markings to align the mounting hardware to the wall. You might need a second set of hands to help you with this step so you can check levelness before reaching for your power tools. 

5. Drill the Pilot Holes

Now that you’ve double-checked your levelness, it’s time to make your wall-mounted TV installation official. Drill into the pilot holes you’ve marked onto the wall. 

6. Attach the Mount

Your second set of hands will help here, too. They can hold the mount whilst you drill it in using your fresh pilot holes. Once your mount is up, check it once again for levelness — things can get off balance, even if you’ve been careful thus far. 

You want to check before you move onto the last step — hanging your TV. 

7. Mount the TV

Your mounting system will come with a plate to attach to the back of your TV. Now’s the time to put that securely in place. Then, follow manufacturer instructions to hang the TV onto the wall. 

Enjoy Your Video Wall Mount

Whether it’s an in-office display, an informational advertisement or a personal TV setup, you’ve now got the tools to create a video wall mount. So, start by brainstorming how and why you’ll use it. Then, you can hang the TVs you need to make that vision a reality. 

We can help you on that quest — we have TV mounts for your home and professional setups. Contact us today to find the right hardware for you.

How to Mount a TV Above a Fireplace and Hide Wires

Drop down tv wall mount

Tranquil Mount TV above fireplace Installation Video

This Video is a step by step install guide for TranquilMount pull-down TV mount. 

Great install tips for installing TranquilMount with an LED/LCD Television above a brick fireplace mantel or flat plasterboard wall.

This Video shows the Drop down tv wall mount is easy to install above the fireplace or stud wall.

MV70 Wall Video Mount bracket
Video Wall Mount
TV Above fireplace
Hight Adjustable TV Mount
Pull Down TV Mount
Pull Down TV Mount

How To Install TV WALL MOUNT – Tranquil Mount TMO100A

TV WALL MOUNT INSTALLATION GUIDE
Tranquil Mount Model:TMO100A
Support 40″ to 65″ TV Screens
Load Capacity: 16.5~70.5 lbs (7.5~32 kg)

Compatibility Guide

TV VESA: 110x100mm, 120x180mm, 200x100mm, 200x200mm, 200x300mm, 300x300mm, 400x200mm, 400x400mm, and 600x400mm.

TV Weight (Without Stand): 7.5~32 kg [Once installed, Mount spring can be adjusted for the required weight]

TV Size: 40″ to 65″ (Recommend for use for TVs 55″ to 65″ (Not recommend for LG TV models, use TMO400A))

Important Things to Note

  • Before any attempt on installation is done, the user should be able to read thoroughly and ensure that he or she understand the manual
  • Tranquil Mount Ltd will therefore not be liable in case of on any damage done to either the TV or the wall since the manual require the installation to be done by a qualified personnel
  • Serious damages on either the wall or the television may be encountered in case the manual is not followed to the latter. The manual provide correct procedures to be followed during installation to avoid any damages that may occur
  • Avoid your hands from moving back and forth in the bracket to prevent them from getting trap and thus causing damages. Keep the product out of reach of children
  • The product should be installed by at least someone with a basic knowledge in the building construction and has clear understanding of the instruction in the manual
  • With maximum capacity of the wall bracket hitting a maximum of 32kg a weight above that may result to damages
  • If mounting to a wall of wood stud construction, be sure that mounting bolt are anchored to the center of the stud, when installing the TV wall mount on a concrete wall, the wall must be at least 8″(203mm) thick with a minimum compressive strength of 2500 to 3000 psi (17.2 to 20.7 MPa), the concrete wall must meet ASTM C39. When installing the TV mount on a cinder block wall, the cinder blocks must meet ASTM C216 specifications and have a minimum nominal width of 8” (203mm). Be sure to mount in a solid part of the block, generally 1″(25 mm) minimum from the side of the block. Do not drill into mortar joints! If plaster/drywall is thicker than 16mm, custom fasteners must be supplied by the installer
  • Ensure you receive assistance during installation i.e. in lifting the equipment and also tighten the screws but not over tightening.
  • Do not attempt to adjust the spring on bracket (part FF) before mounting, read manual carefully. A replacement will be chargeable.

Ensure you have the following tools before installation

Screwdriverspencil, measuring rule, spanner, hammer, hacksaw
Ensure that all parts of the product are included in the product package

Installation requirements

  • This procedure requires at least two people in order to complete the task i.e. bracket installation. Ensure the supporting surface will be able to support the load that is going to combined load of the equipment.
  • In case the equipment is installed next to the fireplace the maximum temperature should never exceed 110° F (43).
  • In case the mounting wall is made of wood, then it should include at least two studs. The covering wall should not be more than 16mm thick
  • The mantle should never extend mounting surface in more than 356mm.
  • The weight of the television should be between 7.5 – 32kg and 40 to 65 inch which should be confirmed by TV owner’s manual
  • The wallboard should be shorter compared to the space above the mantle. All this range depends on how far the mantle is stretched. Refer to chart below and add this additional height to wallboard height to determine if space is tall enough.
If mantle extends:Required space height:
Less than 203mmTV wallboard height plus 102mm
203 – 254mmTV wallboard height plus 127mm
254 – 305mmTV wallboard height plus 178mm
305 – 356mmTV wallboard height plus 203mm


Swing out drawing

The above image is a rough guide for working out the TV drop position, as the VESA holes location on the back of the TV are different from TV to TV..

Installation procedure

  1. Installing the TV wall mount bracket
  • Measure the centerline of the mantle and the area found and mark with a tape. It should be 600m above the fireplace.
  • Plasterboard walls ONLY – Using the stud finder, locate at least two studs and finding their center using a sharp awl to locate each edge lag bolt should be installed in the center of the studs
  • One should ensure there are no big deviations between the holes which need to be 10mm
  • In case the wall is concrete, use an expansion pipe. (In order to have a better installation, it is necessary to have in-wall wiring or wall AV and power plates installed to hide the cords behind the wall. We advise you get a professional installer to do this)

Plasterboard

Concrete

TIPs

  • As illustrated take out wallboard, hex bolt screw and spanner from packaging and let the pre-set wire go through the hole
  • Take out K/EE/FF/N(spanner M10) from the packaging, installation as illustrated in the picture
  • Take the nuts, front panel, bracket and spanner from installation to assist in installation

TIPs

2. Installing the TV screen and adjusting the spring pressure

  • Do selection depending on the TV situation. Pan Head screw +washer; or pan head screw and washer and lock with cross screwdriver.
  • Take out Philips pan head screw, handle and connecting rod from the package in accordance with the TV set, adjust to the correct location and then lock with screw driver
  • Adjust spring pressure to appropriate level (Check TV Manual for correct TV weight without stand) with energy saving wrench.
  • Lift the TV through hooks on the bracket and use a cross screw driver to lock the anti-off screws
  • Install the wall plate covers by clipping them onto the wall plate (They can be painted to the colour of the wall).

FAQ

Work out with the bottom of the television when mounting the TV wall mount above the fireplace.

This TV wall mount Installation guide

Wall bracket, which is the most important part of the Tranquil Mount

Bracket-rises and lowers the TV

The hooks, fitting rod

First mark the center line of the wall panel where the TV will be mounted on above the

Use the spirit level to mark the area of the wall bracket to find the center of the wall

Bottom of bracket should be 600 mtrs above the fireplace

Ensure the centerline is shown in the holes on the wall bracket

Put the spirit above on top of the wall bracket while holding it on the wall to ensure that you have 100% level

Also ensure the bottom is lined with the centre line initially drawn on the wall

When the spirit level is 100%, the centre line passes through the centre of the two holes of the wall bracket,

mark the mounting holes on the four corners of the wall bracket for your fixings

Use the 10mm plugs and the 10mm bolts supplied

For the concrete walls, you can drill the 8 mm holes and use the concrete nails

Drill the 10 mm holes first and then put the 10mm plugs

Mount the wall bracket and then insert the bolts; ensure that the centerline passes through the wall bracket holes before fixing the bolts

Join the bracket to the crosspiece and tighten using the small nuts provided

Use the small spanner provided to tighten the nuts joining the crosspiece and the bracket

Ensure the hook bars are not fixed below the TV

Use the washer and the nuts to screw the hook bars to the back of the TV

Also, ensure the screws at the back of the hook bars are undone for fixing the TV to the crossbar

Use the shorter screws to connect to the handle to the connecting rod already fixed to the hook bars

Slot the four mounting holes on the bracket to the bracket on the wall and the fix it in place with the screws that have been supplied in the box

The arrow written up on the cross bars confirm that the right connection has been realized

The calibration gauge for the television will give information on the adjustments to be made depending on the size of the TV

  1. The hooks on top of the hook bars are for hooking the TV to the bracket on the wall

Posted in Mount.

How To Install TV WALL MOUNT – Tranquil Mount TMO400B

TV WALL MOUNT INSTALLATION GUIDE
Tranquil Mount Model: TMO400A
Support 32″ to 50″ TV Screens
Load Capacity: 13.5-65 lbs (7~30 kg)

Compatibility Guide

TV VESA: 100x100mm, 200x100mm, 200x200mm, 200x300mm, 300x300mm, 400x200mm, and 400x400mm.

TV Weight (Without Stand): 7~30 kg [Once installed, Mount spring can be adjusted for the required weight]

TV Size: 32″ to 50″ (Recommend for LG TV models 32″ to 65″, use TMO400A))

Important Things to Note

  • Before any attempt on installation is done, the user should be able to read thoroughly and ensure that he or she understand the manual
  • Tranquil Mount Ltd will therefore not be liable in case of on any damage done to either the TV or the wall since the manual require the installation to be done by a qualified personnel
  • Serious damages on either the wall or the television may be encountered in case the manual is not followed to the latter. The manual provides correct procedures to be followed during installation to avoid any damages that may occur
  • Avoid your hands from moving back and forth in the bracket to prevent them from getting trapped and thus causing damages. Keep the product out of reach of children
  • The product should be installed by at least someone with a basic knowledge in the building construction and has a clear understanding of the instruction in the manual
  • With a maximum capacity of the wall bracket hitting a maximum of 32kg a weight above that may result in damages
  • If mounting to a wall of wood stud construction, be sure that mounting bolt is anchored to the center of the stud, when installing the TV wall mount on a concrete wall, the wall must be at least 8″(203mm) thick with a minimum compressive strength of 2500 to 3000 psi (17.2 to 20.7 MPa), the concrete wall must meet ASTM C39. When installing the TV mount on a cinder block wall, the cinder blocks must meet ASTM C216 specifications and have a minimum nominal width of 8” (203mm). Be sure to mount in a solid part of the block, generally 1″(25 mm) minimum from the side of the block. Do not drill into mortar joints! If plaster/drywall is thicker than 16mm, custom fasteners must be supplied by the installer
  • Ensure you receive assistance during installation i.e. in lifting the equipment and also tighten the screws but not over tightening.
  • Do not attempt to adjust the spring on the bracket (part FF) before mounting, read manual carefully. A replacement will be chargeable.

Ensure you have the following tools before installation

Screwdriverspencil, measuring rule, spanner, hammer, hacksaw
Ensure that all parts of the product are included in the product package

Installation requirements

  • This procedure requires at least two people in order to complete the task i.e. bracket installation. Ensure the supporting surface will be able to support the load that is going to a combined load of the equipment.
  • In case the equipment is installed next to the fireplace the maximum temperature should never exceed 110° F (43). It should also not be on when the fire is burning.
  • In case the mounting wall is made of wood, then it should include at least one studs. The covering wall should not be more than 16mm thick
  • The mantle should never extend mounting surface in more than 350mm.
  • The weight of the television should be between 6 – 30kg and 32 to 65 inch which should be confirmed by the TV owner’s manual
  • The wallboard should be shorter compared to the space above the mantle. All this range depends on how far the mantle is extended


If mantle extends:Required space height:
Less than 180mmTV wallboard height plus 135mm
180 – 240mmTV wallboard height plus 150mm
240 – 300mmTV wallboard height plus 195mm
300 – 350mmTV wallboard height plus 265mm

Installation procedure

  1. Installing the TV wall mount bracket
  • Measure the centerline of the mantle and the area found and mark with a tape. It should be 600m above the fireplace.
  • Plasterboard walls ONLY – Using the stud finder, locate at least two studs and finding their center using a sharp awl to locate each edge lag bolt should be installed in the center of the studs
  • Detach the plate from the arm, mark on the wall the install location. Use the supporting
  • One should ensure there are no big deviations between the holes which need to be 10mm
  • In case the wall is concrete, use an expansion pipe. (In order to have a better installation, it is necessary to have in-wall wiring or wall AV and power plates installed to hide the cords behind the wall. We advise you get a professional installer to do this)

Plasterboard

Concrete

TIPs

  • As illustrated take out wallboard, hex bolt screw and spanner from packaging and let the pre-set wire go through the hole
  • Take the nuts, front panel, bracket and spanner from installation to assist in installation

TIPs

  • Finally taking out hexagon wrench from packaging lock the four head pan head screws (M8x10) with hexagon wrench use cable ties to up the wires.
  • Take out K/EE/FF/N(spanner M10) from the packaging, installation as illustrated in the picture.

2. Installing the TV screen and adjusting the spring pressure

  • Do selection depending on the TV situation. Pan Head screw +washer; or pan head screw and washer and lock with cross screwdriver.
  • Take out Philips pan head screw, handle and connecting rod from the package in accordance with the TV set, adjust to the correct location and then lock with screw driver
  • Adjust spring pressure to appropriate level (Check TV Manual for correct TV weight without stand) with energy saving wrench.
  • Lift the TV through hooks on the bracket and use a cross screw driver to lock the anti-off screws
  • Install the wall plate covers by clipping them onto the wall plate (They can be painted to the colour of the wall).

FAQ

Work out with the bottom of the television when mounting the TV wall mount above the fireplace.

This TV wall mount Installation guide

Wall bracket, which is the most important part of the Tranquil Mount

Bracket-rises and lowers the TV

The hooks, fitting rod

First mark the center line of the wall panel where the TV will be mounted on above the

Use the spirit level to mark the area of the wall bracket to find the center of the wall

Bottom of bracket should be 600 mtrs above the fireplace

Ensure the centerline is shown in the holes on the wall bracket

Put the spirit above on top of the wall bracket while holding it on the wall to ensure that you have 100% level

Also ensure the bottom is lined with the centre line initially drawn on the wall

When the spirit level is 100%, the centre line passes through the centre of the two holes of the wall bracket,

mark the mounting holes on the four corners of the wall bracket for your fixings

Use the 10mm plugs and the 10mm bolts supplied

For the concrete walls, you can drill the 8 mm holes and use the concrete nails

Drill the 10 mm holes first and then put the 10mm plugs

Mount the wall bracket and then insert the bolts; ensure that the centerline passes through the wall bracket holes before fixing the bolts

Join the bracket to the crosspiece and tighten using the small nuts provided

Use the small spanner provided to tighten the nuts joining the crosspiece and the bracket

Ensure the hook bars are not fixed below the TV

Use the washer and the nuts to screw the hook bars to the back of the TV

Also, ensure the screws at the back of the hook bars are undone for fixing the TV to the crossbar

Use the shorter screws to connect to the handle to the connecting rod already fixed to the hook bars

Slot the four mounting holes on the bracket to the bracket on the wall and the fix it in place with the screws that have been supplied in the box

The arrow written up on the cross bars confirm that the right connection has been realized

The calibration gauge for the television will give information on the adjustments to be made depending on the size of the TV

  1. The hooks on top of the hook bars are for hooking the TV to the bracket on the wall

Posted in Mount.

Add to cart